Engage With Your Ancestors' Military Past
Hello
you are logged in
you are logged in

Learn About WW1
START here - Top tips - Researching Military Ancestors
-
Set aside time
Set aside time. Be systematic about your research. Buy a notebook and pencil and record everything you find out in it. Note down all details and record when and where they came from.
-
Trace and gather
Trace and gather together all family anecdotes, documents, photographs, medals and anything else associated with the relative you are researching. All may contain clues.
-
Ask anyone
Ask anyone who knew the relative or his immediate descendants for any stories about them.
-
Records
Records are often available. There are many sources of information but use all with scepticism until the ‘fact’ is proven. There was never any one record of the service life of our ancestors. There was a war on. Some records have been destroyed. Most official records are incomplete, dispersed and need to be assembled together to get the bigger picture. It is rather like a detective investigating a crime.
Time is on your side as more and more records are translated and published on the Internet.
-
Tenacity
Tenacity will usually win eventually. Keep pursuing your goal.You must never give up. Be resolute, like a dog with a bone. Information surfaces all the time.
Battles & Engagements of British Armies in France & Flanders 1914-1918
-
Phases I - VII
Phase I – The German Invasion 1914:
Operations. Retreat from Mons: (23 August – 5 September 1914)
Battle of Mons 23 - 24 August 1914
Action of Élouges 24 August 1914
Action of Solesmes 25 August 1914
Affair of Landrecies 25 August 1914
Battle of Le Cateau 26 August 1914
Affair of Le Grand Fayt 26 August 1914
Affair of Étreux 27 August 1914
Affair at Cérizy 27 August 1914
Affair at Néry 1 September 1914
Action of Crépy en Valois 1 September 1914
Action of Villers Cottérêts 1 September 1914
Operations. Advance to the Aisne: (6 September – 1 October 1914)
Battle of the Marne 1914 12 – 15 September 1914
Action on Aisne Heights 20 September 1914
Action of Chivy 26 September 1914
Operations. Defence of Antwerp: (4 – 10 October 1914)
Operations in Flanders 1914: (10 October – 22 November 1917)
Battle of La Bassée 10 October – 2 November 1914
Battle of Messines 1914 12 October – 2 November 1914
Battle of Armentières 1914 13 October – 2 November 1914
The Battles of Ypres 1914: [First Ypres] 19 October – 22 November 1914
Battle of Langemarck 1914 21 – 24 October 1914
Battle of Gheluvelt 29 – 31 October 1914
Battle of Nonne Bosschen 11 November 1914
Phase II – Trench Warfare 1914-1916:
Winter Operations 1914-15: (November 1914 - February 1915)
Defence of Festubert 23 – 24 November 1914
Attack on Wytschaete 14 December 1914
Defence of Givenchy 25 January 1915
First action of Givenchy 2- 21 December 1915
Affairs of Cuinchy 29 January, 1 and 6 February 1915
Summer Operations 1915:
Battle of Neuve Chapelle 10 – 13 March 1915
Action of St Eloi 14 – 15 March 1915
Capture of Hill 60 17 – 22 April 1915
The Battles of Ypres 1915: [Second Ypres] 22 April – 25 May 1915
Battle of Gravenstafel 22 – 23 April 1915
Battle of St Julien 24 April – 4 May 1915
Battle of Frezenberg 8 – 13 May 1915
Battle of Bellewaarde 24 - 25 May 1915
Battle of Aubers [Ridge]: 9 May 1915
Attack on Fromelles 9 May 1915
Attack at Rue du Bois 9 May 1915
Battle of Festubert 15 – 25 May 1915
Second action of Givenchy 15 – 16 June 1915
First attack on Bellewaarde 16 June 1915
Actions at Hooge 19 & 30 July and 9 August 1915
Battle of Loos: 25 September – 8 October 1915
Action Piètre 25 September 1915
Action of Bois Grenier 25 September 1915
2nd attack on Bellewaarde 25 – 26 September 1915
Hohenzollern Redoubt 13 – 19 October 1915
Local Operations 1916:
Actions of the Bluff 14 – 15 February and 2 March 1916
Actions of St Eloi Craters 27 March – 16 April 1916
German attack Vimy Ridge 21 May 1915
Battle of Mount Sorrel 2 – 13 June 1916
Phase III – Allied Offensive 1916:
Operations on the Somme: (1 July – 18 November 1916)
Battle of the Somme 1916: 1 July – 18 November 1916
Battle of Albert 1916 1 – 13 July 1916
Attack on Gommecourt Salient 1 July 1916
Battle of Bazentin 14 – 17 July 1916
Attack at Fromelles 19 July 1916
Attacks High Wood 20 – 25 July 1916
Battle of Delville Wood 15 July – 3 September 1916
Battle of Pozières 23 July – 3 September 1916
Battle of Guillemont 3 – 6 September 1916
Battle of Ginchy 9 September 1916
Battle of Flers-Courcelette 15 – 22 September 1916
Battle of Morval 25 – 28 September 1916
Battle of Thiepval 26 – 28 September 1916
Battle of Le Transloy 1 – 18 October
Battle of the Ancre Heights 1 October – 11 November 1916
Battle of the Ancre 13 – 18 November 1916
Phase IV – Advance to the Hindenburg Line 1917:
Operations on the Ancre: (11 January – 13 March 1917)
Actions of Miraumont 17 – 18 February 1917
Capture of the Thilloys 25 February – 2 March 1917
Capture of Irles 10 March 1917
German Retreat to Hindenburg Line: (14 March – 5 April 1917)
Capture of Bapaume 17 March 1917
Occupation of Péronne 18 March 1918
Phase V - Allied Offensives 1917:
Operations. Arras Offensive: (9 April – 15 May 1917)
Battles of Arras 1917: 9 April – 4 May 1917
Battle of Vimy 9 – 14 April 1917
First Battle of the Scarpe 9 – 14 April 1917
Second Battle of the Scarpe 23 – 24 April 1917
Attack on La Coulotte 23 April 1917
Battle of Arleux 28 – 29 April 1917
Third Battle of the Scarpe 3 – 4 May 1917
Capture of Rœux 13 – 14 May 1917
Capture of Oppy Wood 28 June 1917
Flanking Operations. Arras Offensive: 11 April – 16 June 1917
(a) Round Bullecourt (11 April – 16 June 1917)
First attack on Bullecourt 11 April 1917
German attack on Lagnicourt 15 April 1917
Battle of Bullecourt 3 – 17 May 1917
Actions on the Hindenburg Line 20 May – 16 June 1917
(b) Towards Lens: (3 June – 26 August 1917)
Affairs south of Souchez River 3 – 25 June 1917
Capture of Avion 26 – 29 June 1917
Battle of Hill 70 15 – 25 August 1917
Operations. The Flanders Offensive: (7 June – 10 November 1917)
Battle of Messines 7 – 14 June 1917
German attack on Nieuport 10 – 11 July 1917
The Battles of Ypres 1917: [Third Ypres] 31 July – 10 November 1917
Battle of Pilckem 31 July – 2 August 1917
Capture of Westhoek 10 August 1917
Battle of Langemarck 1917 16 – 18 August 1917
Battle of the Menin Road 20 -25 September 1917
Battle of Polygon Wood 26 September – 3 October 1917
Battle of Broodseinde 4 October 1917
Battle of Poelcappelle 9 October 1917
First Battle of Passchendaele 12 October 1917
Second Battle of Passchendaele 26 October – 10 November 1917
Cambrai Operations: (20 November – 7 December 1917)
Battle of Cambrai 20 November – 3 December 1917
Tank attack 20 – 21 November 1917
Capture of Bourlon Wood 23 – 28 November 1917
German Counter-Attacks 30 November – 3 December 1917
Action at Welch Ridge 30 December 1917
Phase VI - The German Offensives 1918:
Operations. Offensive in Picardy: (21 March – 5 April 1918)
First Battles of the Somme 1918: 21 March – 5 April 1918
Battle of St Quentin 21 – 23 March 1918
Actions at Somme Crossings 24 – 25 March 1918
First Battle of Bapaume 1918 24 – 25 March 1918
Battle of Rozières 26 – 27 March 1918
First Battle of Arras 1918 26 March 1918
Battle of the Avre 4 April 1918
Battle of the Ancre 1918 5 April 1918
Actions at Villers Bretonneux 24 – 25 April 1918
Capture of Hamel 4 July 1918
Operations. Offensive in Flanders: (9 – 29 April 1918)
Battles of the Lys 9 – 29 April 1918
Battle of Estaires 9 – 11 April 1918
Battle of Messines 1918 19 – 11 April 1918
Battle of Hazebrouck 12 – 15 April 1918
Battle of Bailleul 13 – 15 April 1918
First Battle of Kemmel 17 – 19 April 1918
Battle of Béthune 18 April 1918
Second Battle of Kemmel 25 – 26 April 1918
Battle of the Scherpenberg 29 April 1918
Action at La Becque 28 June 1918
Capture of Meteren 19 July 1918
Operations. Offensives in Champagne: (27 May – 6 June 1918)
Battle of the Aisne 1918 27 May – 6 June 1918
Phase VII – Advance to Victory:
Operations. Counter-Attack in Champagne: (20 July – 2 August 1918)
Battles of the Marne 1918: 20 July – 2 August 1918
Battles of Soissonais & of the Ourcq 23 July – 2 August 1918
Battle of Tardenois 20 – 31 July 1918
Operations. Advance in Picardy: (8 August – 3 September 1918)
Battle of Amiens 8 – 11 August 1918
Actions around Damery 15 – 17 August 1918
Second Battles of the Somme 1918: 21 August – 3 September 1918
Battle of Albert 1918 21 – 23 August 1918
Second Battle of Bapaume 1918 31 August – 3 September 1918
Advance in Flanders: (18 August – 6 September 1918)
Action of Outtersteene Ridge 18 August 1918
Operations. Breaking the Hindenburg Line: (26 August – 12 October 1918)
Second Battle of Arras 1918: 26 August – 3 September 1918
Battle of the Scarpe 1918 26 – 30 August 1918
Battle of Drocourt – Quéant 2 – 3 September 1918
Battles of the Hindenburg Line: 12 September – 9 October 1918
Battle of Havrincourt 12 September 1918
Battle of Epéhy &am
British Army Ranks
-
Over 100 different army ranks of men and women
Because of the peculiarities of the time some ‘ranks’ e.g. lance corporal, were classified as ‘appointments’. Many of the lower ranks especially, had traditional, comparable titles for men in non-infantry units. For example, both a sapper (Royal Engineers) and a gunner (Royal Artillery) were approximately equivalent in rank to a private. A bombardier in the Royal Artillery and a forewoman in Queen Mary’s Army Auxiliary Corps were equivalent to a corporal.
At the non-commissioned officer (NCO) – warrant officer (WO) level there were many titles depending upon the branch of service and the job. Examples include: ‘shoeing and carriage smith corporal’, ‘artificer lance corporal’, ‘bandmaster’, and ‘armament quarter master sergeant’. Indeed the supply and provision sections (the quartermasters of the army), had a whole plethora of ranks to themselves. The regimental sergeant major was the senior warrant officer (first class) in a battalion responsible for discipline. Of equal rank, if perhaps not status, was the regimental quarter master sergeant.
Some units had interesting titles for various ranks: In the cavalry a corporal of the horse was equivalent to an infantry sergeant, a conductor in the Royal Army Ordnance Corps was a warrant officer (first class) and a nagsman was a private in the Army Service Corps. A list of ranks is given later.
Commissions during the war were most commonly temporary ones that would not continue much beyond the cessation of hostilities – hence the expression ‘Temporary Gentlemen’. As a result of casualties, officers holding comparatively junior substantive ranks, quite often held fairly senior posts temporarily. But only until regular army officers became available to fill those senior posts on a permanent basis. There were no temporary gentlemen appointed on a substantive basis to command brigades and above. The first table below shows comparative ranks for officers with the Royal Navy. From its inception on 1 April 1918 until after the end of the Great War, the Royal Air Force used the same rank names as the army.
Officers:
Army Royal Navy
Field Marshal Admiral of the Fleet
General Admiral
Lieutenant General Vice Admiral
Major General Rear Admiral
Brigadier General Commodore
Colonel Captain
Lieutenant Colonel Commander
Major Lieutenant Commander
Captain Lieutenant
Lieutenant Sub Lieutenant
Second Lieutenant
Other ranks:
Using Soldiers Died in the Great War as a source, it is possible to identify well over 100 different army ‘ranks’ of men and women who perished in the conflict and these are listed below in their main groupings.
Warrant Officers:
Armament Sergeant Major, Bandmaster, Battery Sergeant Major, Company Sergeant Major, Conductor, Corporal Major, Drill Sergeant, Farrier Sergeant Major, Machinist Sergeant Major, Master Gunner (WO I), Master Gunner 1st class, Master Gunner 2nd class, Orderly Room Quarter Master Sergeant, Regimental Quarter Master Sergeant, Regimental Sergeant Major, Sergeant Major, Squadron Corporal Major, Staff Sergeant Major, Sub-Conductor, Superintending Clerk Transport Sergeant Major, Warrant Officer, Warrant Officer Class I, Warrant Officer Class II, Wheeler Quarter Master Sergeant.
Sergeants:
Armament Quarter Master Sergeant, Armourer Staff Sergeant, Band Sergeant, Battery Quarter Master Sergeant, Bugler Major, Bugler Sergeant, Colour Sergeant, Company Quarter Master Sergeant, Cook Sergeant, Corporal of Horse, Drummer Sergeant, Farrier Corporal of Horse, Farrier Quarter Master Sergeant, Farrier Sergeant, Farrier Staff Sergeant, Fitter Sergeant, Fitter Staff Sergeant, Flight Cadet, Lance Sergeant, Orderly Room Sergeant, Piper Sergeant, Quarter Master Sergeant, Saddler Quarter Master Sergeant, Saddler Sergeant, Saddler Staff Sergeant, Saddle-Tree Maker Sergeant, Sergeant, Shoeing Smith Sergeant, Signaller Sergeant, Squadron Quarter Master Corporal, Staff Sergeant, Trumpeter Sergeant, Wheeler Quarter Master Sergeant, Wheeler Sergeant, Wheeler Staff Sergeant, Wheelwright Sergeant.
Corporals:
Artificer Corporal, Artificer Lance Corporal, Bombardier, Corporal, Farrier Corporal, Farrier Staff Corporal, Fitter Corporal, Forewoman, Lance Bombardier, Lance Corporal, Saddler Corporal, Shoeing & Carriage Smith Corporal, Shoeing Smith Corporal, Signaller Bombardier, Signaller Corporal, Signaller Lance Bombardier, Smith Corporal, Wheeler Corporal.
Privates:
Armourer, Artificer, Band Boy, Bandsman, Boy, Bugler, Cadet, Cyclist, Driver, Farrier, Fitter, Guardsman, Gunner, Motor Cyclist, Musician, Nagsman, Piper, Private, Rifleman, Rough Rider, Saddler, Sapper, Shoeing & Carriage Smith, Shoeing Smith, Signaller, Strapper, Tailor, Trooper, Trumpeter, Waggoner, Wheeler, Wheelwright, Worker.
Leaving The Armed Forces Honourably And Alive
-
The forms, codes and reasons
Although men in Kitchener’s Armies were technically regular soldiers, their duration of service was effectively for the duration of the war. Because of the requirements of the Army of Occupation of the Rhine, re-garrisoning the Empire with regular soldiers and fighting in Russia etc, some men were retained. Additionally it was not possible for literally millions of men to leave simultaneously. Some men had already left to return to vital war work. Those with jobs waiting got some priority and there was a program of release for the others. It was not however perceived as entirely fair and a certain amount of unrest occurred from soldiers awaiting release long after the end of the war. Regular soldiers naturally remained in the army. Territorial Force men, once released from active service, resumed their civilian roles interspersed with military training and camps.
Various procedures, including the following, were carried out at Dispersal Stations:
- A medical examination recorded any injuries that might result in compensation.
- An inventory of equipment was taken. Deficiencies usually had to be paid for.
- Any remaining foreign currency was exchanged for sterling.
- Final pay and war gratuity was calculated and eventually paid.
Many Army Forms (AF) were completed, and some given to the soldier. Only a few are described here:
AF Z.11
Protection certificate. A form identifying the soldier, authorising an advance of two pounds against monies due, and providing for more pay in instalments whilst on the 28 days furlough [leave].
AF B. 108E
A character certificate and vital for his next employment. With so many men looking for work, employers could afford to be choosy. It also certified the length of service in the Army.
AF Z. 21
Perhaps the most important was the one that authorised his immediate future on leaving the army. There were four categories of release.
- Discharge (final release from the army)
- Transfer to various classes of reserve.
- Disembodiment: The terminology used when a member of the Territorial Force is released from full time active service.
- Demobilization: Date physically left the army, but not necessarily without conditions, such as reserve service.
It also gave some medal entitlement details and told where to rejoin if recalled.
Reserve classes were:
- Classes P, T & W: Authority to leave the forces and return to civilian duties. It mostly applied to vital war work. Each class varies slightly in the conditions attached to the soldier’s release.
- Class Z: The most common. Most soldiers were not finally discharged at the end of 1918 but transferred to Class Z Reserve. This was in case Germany rejected the peace conditions and resumed hostilities. By March 1920 most men were finally released from the army.
Some received slips certifying such matters as that they were ‘free from vermin, scabies and venereal disease’; and ‘that clothing, boots etc are in a clean and serviceable condition’ etc. The soldier could keep his steel helmet, boots and uniform but was not supposed to wear it with any badges or insignia after twenty-eight days. His greatcoat could be kept or exchanged for one pound. He was additionally given a ration book, an unemployment insurance policy, a railway warrant for travel home and civilian clothing.
Sailors who were killed or died in service were recorded as ‘discharged dead’.
Campaign Medals of The Great War
-
1914 Star
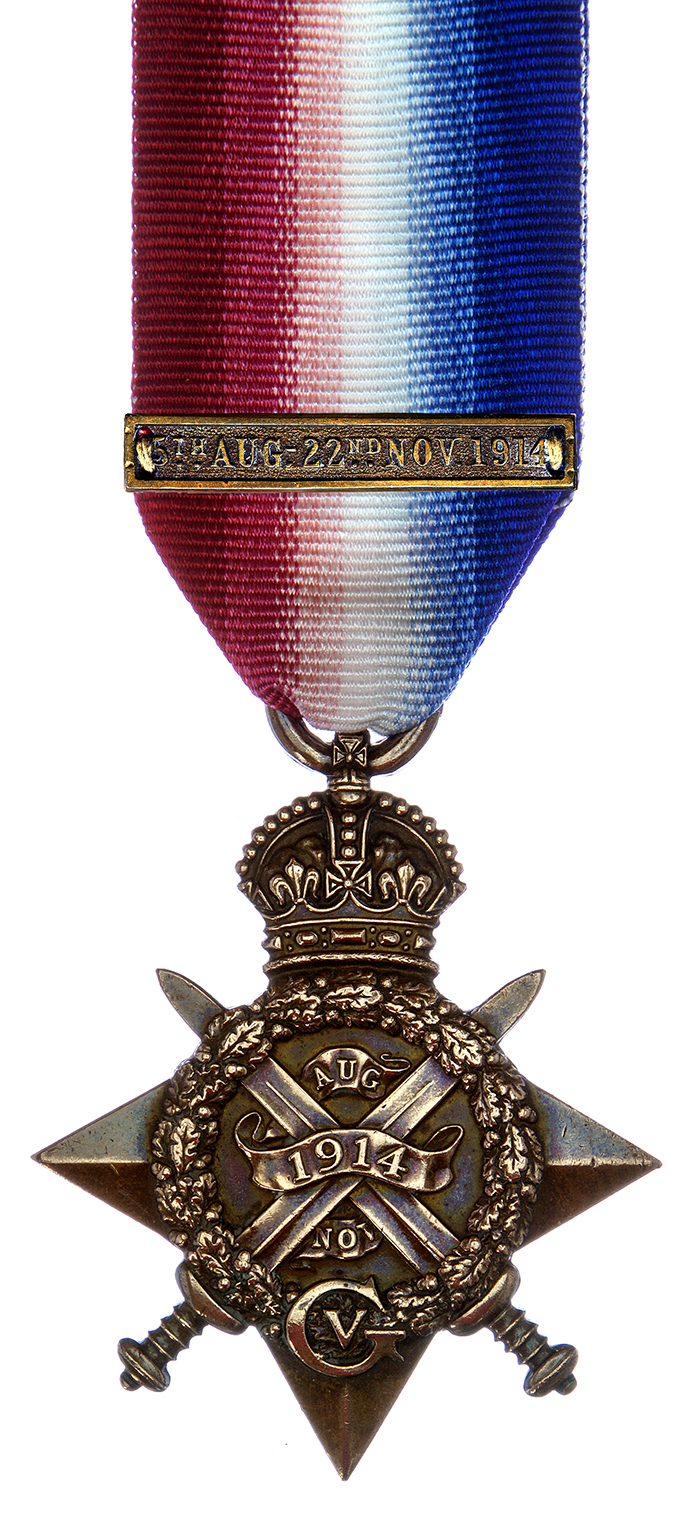 This award was sanctioned in 1917 for members of the British Expeditionary Force for services during the first phase of the war.
It was issued to those who served in France and Belgium between 5th August 1914 and 22nd November 1914.
Most of the 378,000 recipients were military personnel belonging to the Regular Army or Territorial Force, although some naval units who served ashore received the award.
In addition, a very small number of Australian and Canadian recipients were entitled to the award.
The star is of bronze and has three points, the fourth ending in a crown and the suspension ring. There are two crossed swords incorporated in the design between these points.
The obverse contains a scroll and the date '1914' in the centre, with 'Aug' above and 'Nov' below, the above all surrounded by a wreath.
The reverse is plain and contains the recipient's number, rank, name and regiment in three lines of small impressed capitals.
Recipients of this star who were under fire during the period were entitled to wear a bar, sanctioned in 1919, which was sewn onto the ribbon; this bar simply had the relevant qualifying dates on it.
This award is incomplete without the British War Medal and Victory Medal, as these two awards were automatically issued to those with the star. The ribbon is of watered red, white and blue. -
1914-15 Star
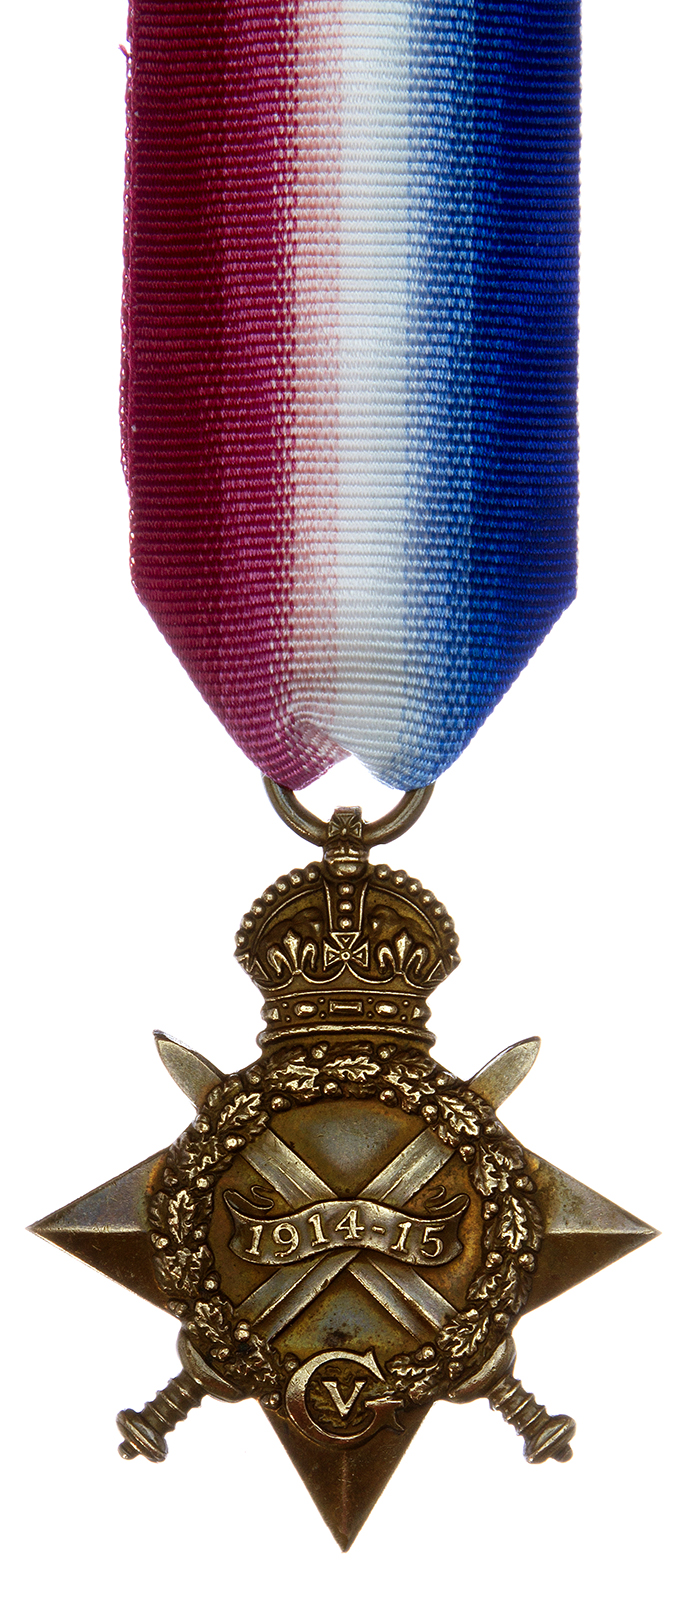 This award is identical to the 1914 Star, except for the obverse centre, which has the date '1914-15' instead of '1914', and the two months are omitted.
In all other respects the two awards are the same. The 1914-15 award was issued to all those who served in a theatre of war between 5th August 1914 and 31st December 1915, except those who already qualified for the 1914 Star by virtue of their service with the BEF.
Thus a naval rating who was killed at sea in 1914 would receive the 1914-15 Star. The star was issued for services in France, the Dardanelles, East and West Africa, New Guinea, and several other small theatres of war.
Due to the large number issued - 2,350,000 - the star is very common. It was issued to the three British services, various Commonwealth and Imperial forces, and various other recipients such as civilians attached to the forces. The ribbon is identical to that of the 1914 Star. -
British War Medal 1914-20
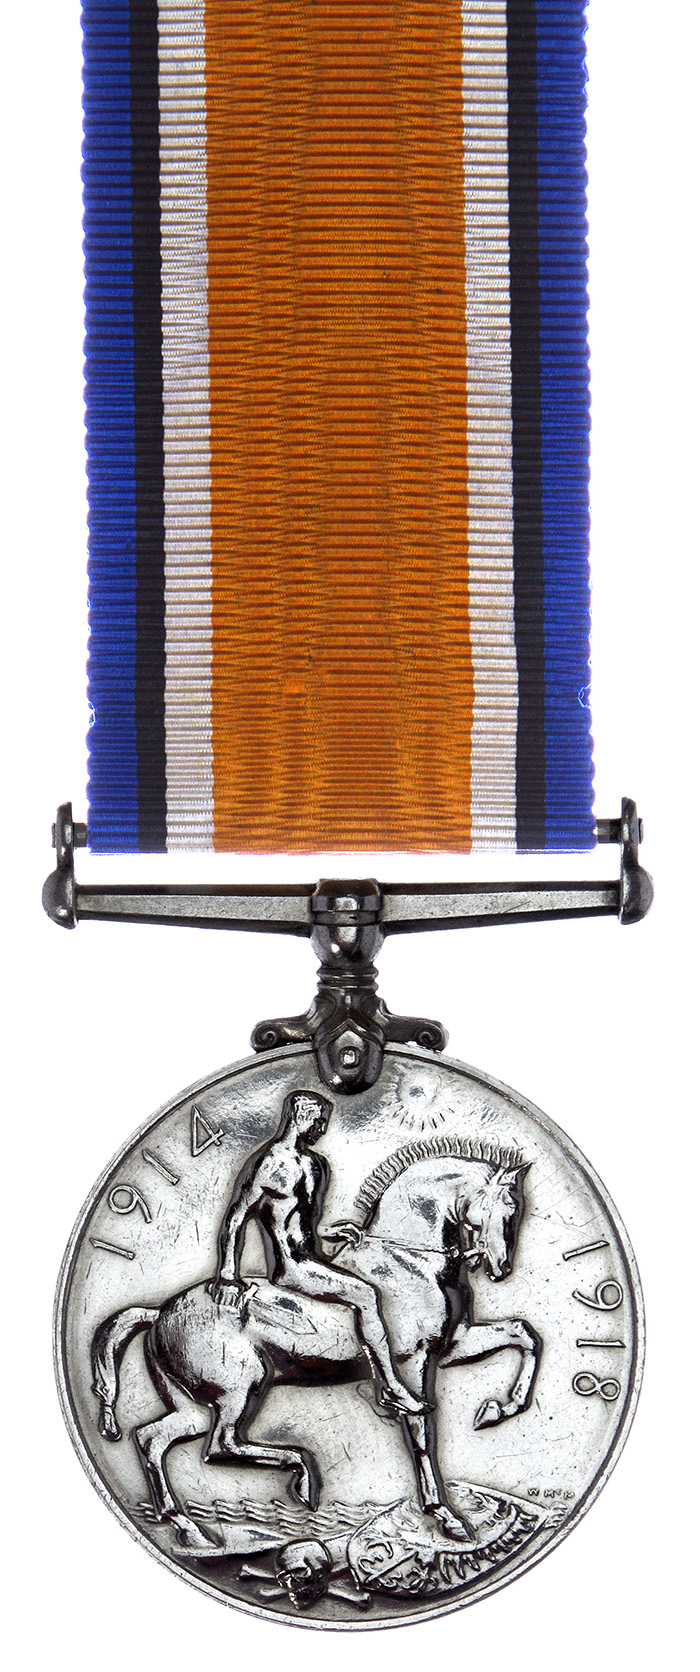
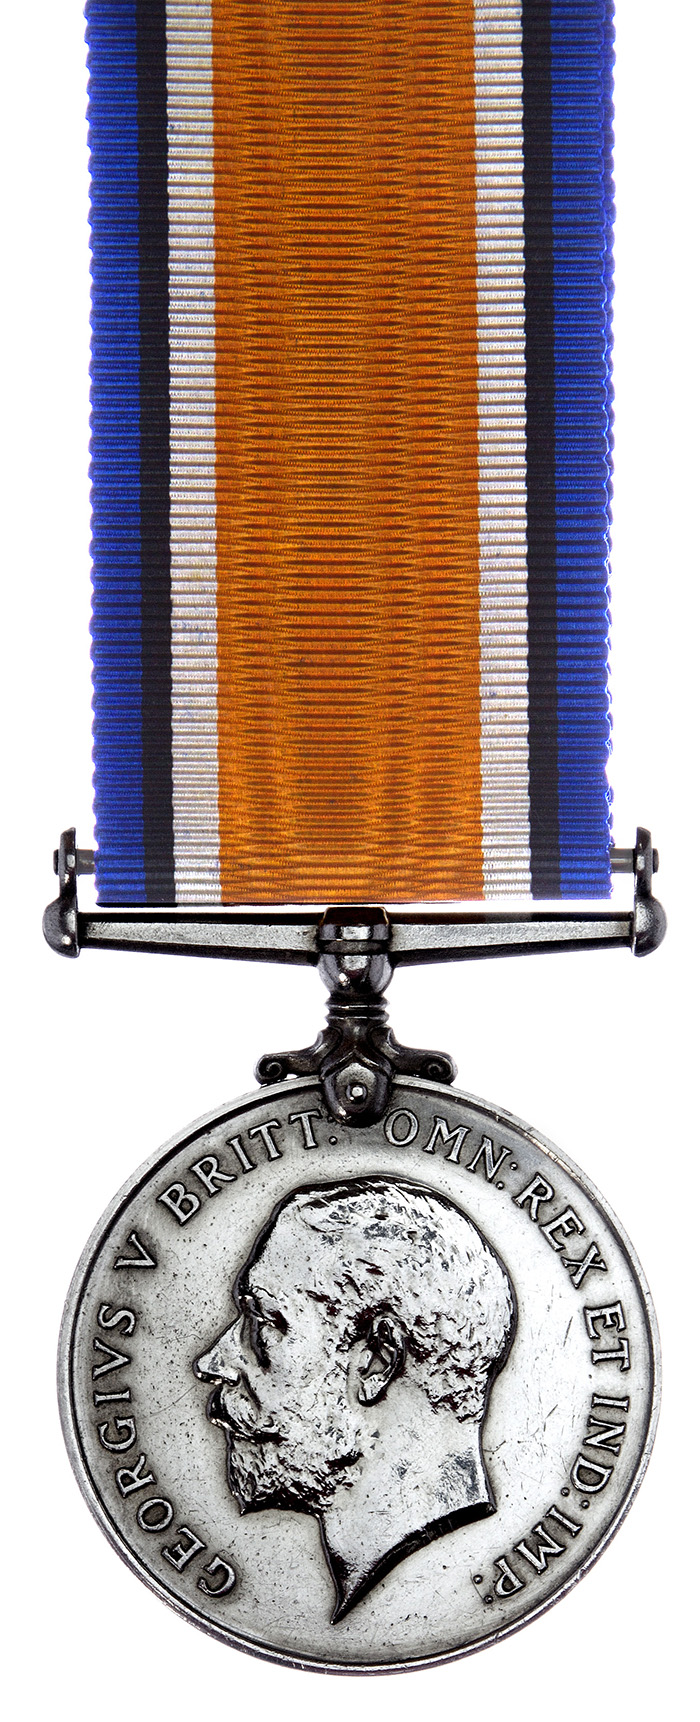 This medal, issued in both silver and bronze, was issued for services during the First World War. The basic qualification for the award was service in any of the three armed services, any Commonwealth or Imperial formation, or in certain recognised voluntary organisations. No clasps were issued, the medal applying to all theatres of war, including some categories of service in the United Kingdom.
This award is usually found with the Victory Medal of 1914-18, but can be awarded singly. In all, some 6.5 million were issued in silver, with some 110,000 in bronze to natives in various labour corps.
The medal was issued for some operations after the 1918 Armistice, mainly for services in Russia and minesweeping operations.
The obverse shows the coinage head of George V with an inscription, while the reverse depicts the mounted figure of St. George trampling the shield of the Central Powers. The dates '1914' and '1918' also appear. The suspension is straight and non-swiveling. All awards have impressed naming in small, block capitals of varying types; the regiment or corps is omitted from the naming on awards to Army officers.
This is the most common silver medal in the British series, and as such its value is unfortunately dominated by the price of scrap silver. The ribbon is of a wide central orange stripe with narrow stripes of white, black and blue at each edge. -
Victory Medal 1914-19
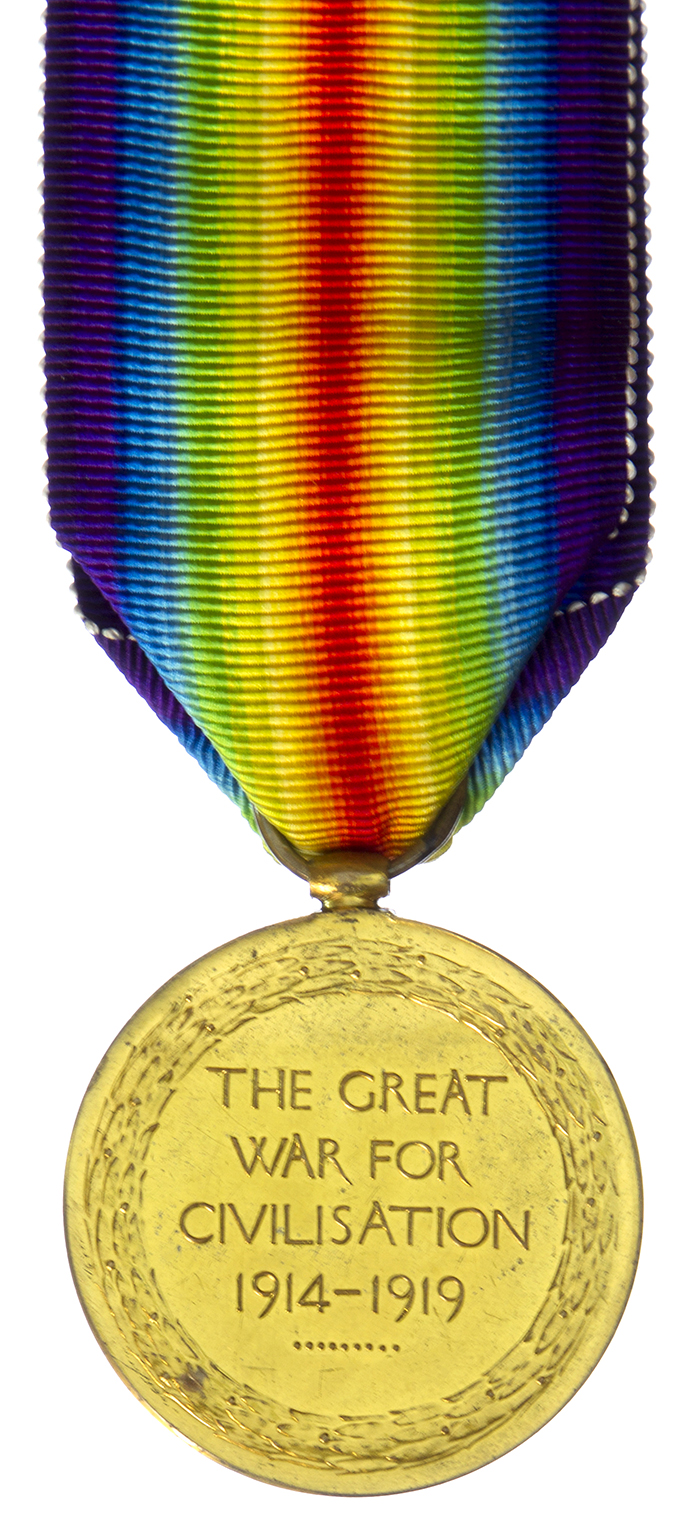
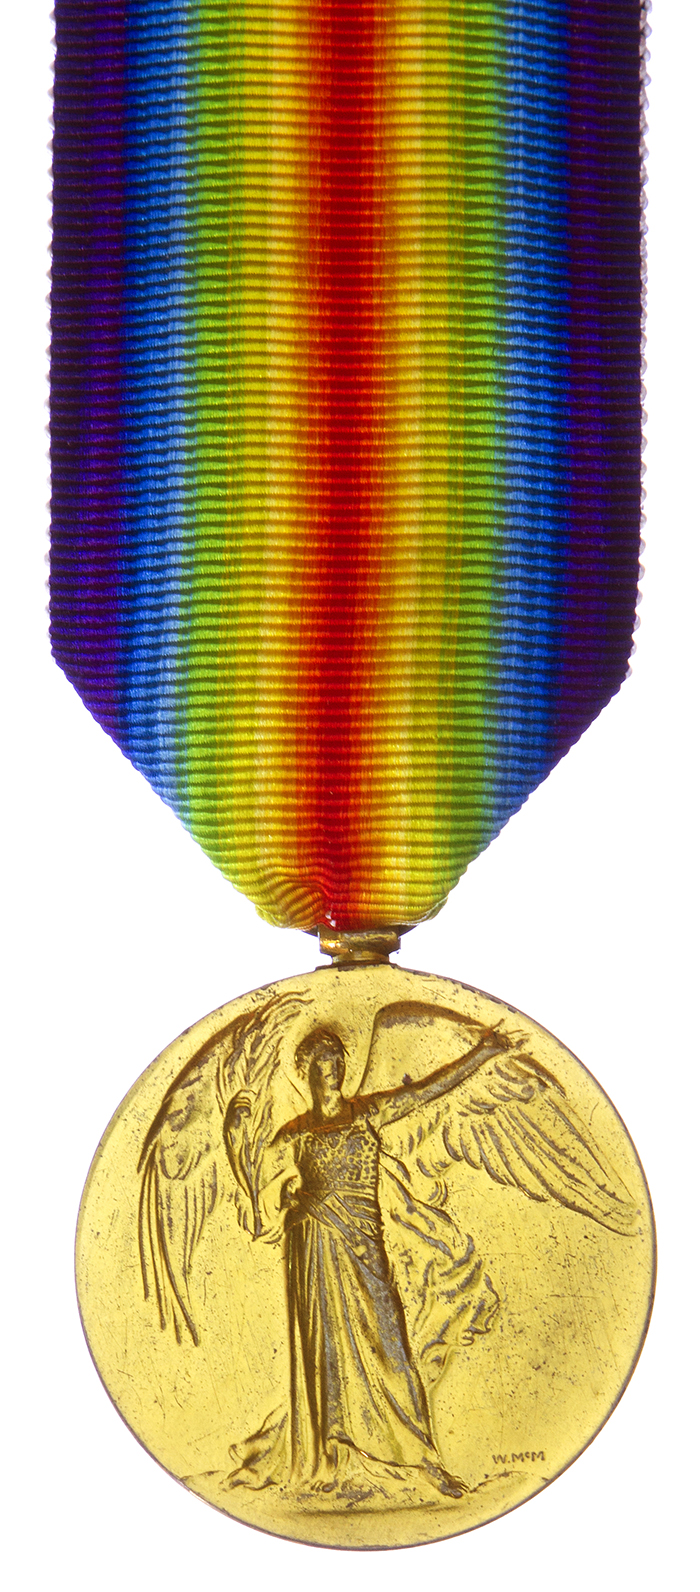 This bronze medal was issued for services during the First World War. It was awarded to all those who received the 1914 or 1914-15 Star and to most of those who received the British War Medal of 1914-20; it could not be awarded alone. The main qualification for the award was any service in a theatre of war between 5th August 1914 and 11th November 1918. Most recipients were service personnel, including those from Commonwealth and Imperial services, although some civilians working in recognised voluntary organisations also received the award. Those who were mentioned in dispatches between August 1914 and August 1920 wore a bronze oak leaf on the ribbon. Some 5,750,000 medals were issued in all. The obverse depicts the winged figure of Victory holding a palm branch, while the reverse contains an inscription inside a wreath; those awards to South African recipients have this inscription in both English and Afrikaans. The naming is always impressed in one of several styles, the regimental details being omitted on those awards to Army officers. The suspension is by a loop attached to the medal and a ring, while the ribbon is of a double rainbow pattern of red, green, blue and violet.
 -
Territorial Force War Medal 1914-19
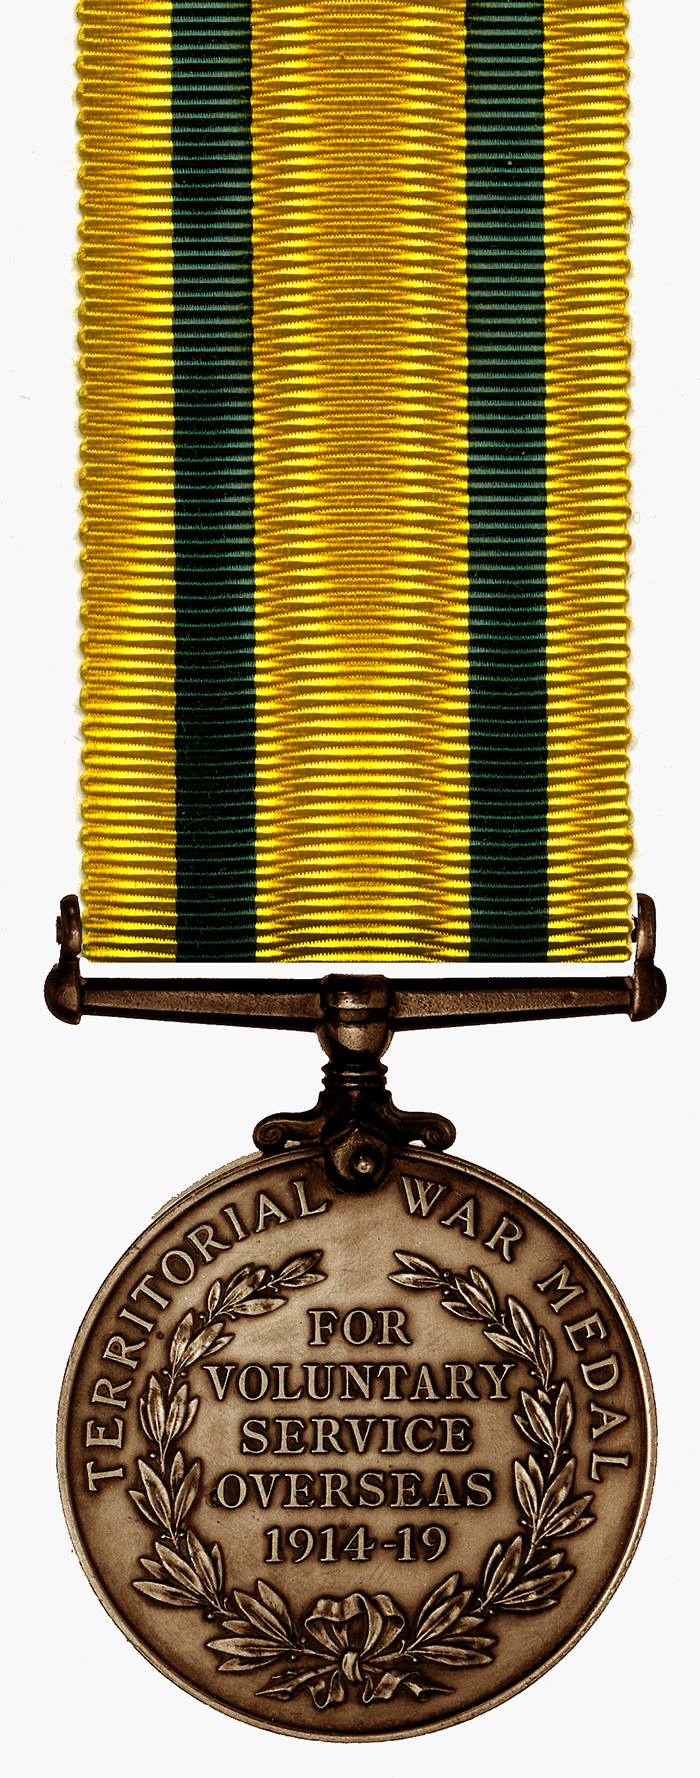
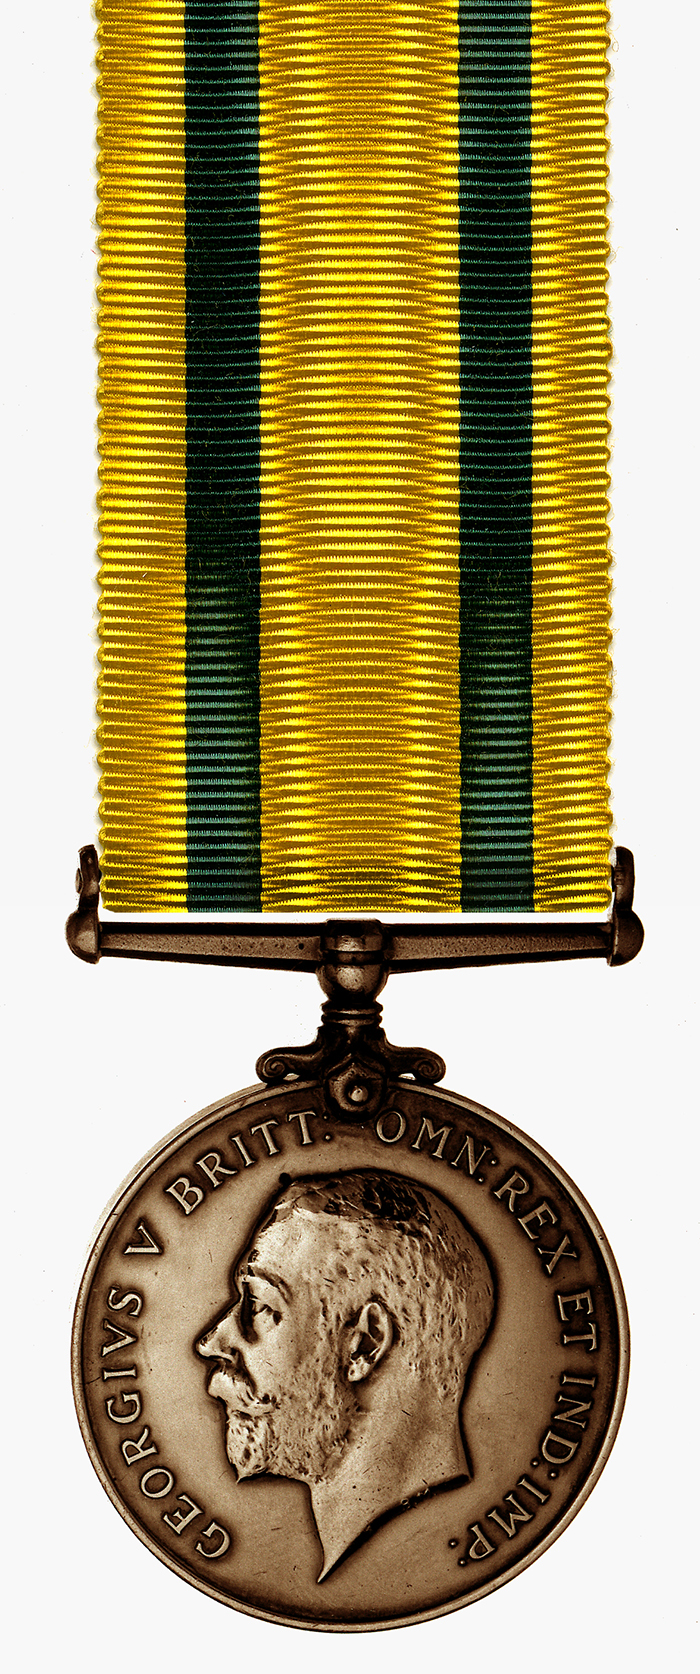 This medal, which was issued in bronze and without a clasp, was awarded only to members of the Territorial Force. To qualify, the recipient had to be a member of the TF on or before 30th September 1914, and had to have served outside the United Kingdom between 4th August 1914 and 11th November 1918. However, members of the TF who qualified for the 1914 or 1914-15 Stars were not eligible to receive the award, which was worn after the Victory Medal. Some 34,000 medals were issued, making it the scarcest award for the First World War. Many units received very few medals indeed. Particularly sought-after are awards to Yeomanry, Nursing Sisters and RFC/RAF. The medal is always named in small block capitals, and those to officers include the regiment or corps in the naming. The ribbon is of yellow with two green stripes.
 -
Possible combinations of medals which arise
The 1914 Star was awarded ONLY for service on land, within France and Belgium. It is scarce to naval units and must always be accompanied by the British War and Victory Medals. The 1914-15 Star was much more widely awarded, but must also be accompanied by the British War and Victory Medals. It was not awarded to the Merchant Navy. It was not possible to earn both Stars.
The British War Medal was awarded to all those who left their places of residence and rendered approved service overseas. It could thus be awarded on its own to those who served abroad, but not in a theatre of war, in Malta, Gibraltar or certain parts of India, for instance. It was also awarded to those who came from abroad and served in the United Kingdom. The Victory Medal was awarded to those who actually served on the establishment of a unit within a theatre of war. Thus, it was not awarded to those who entered a theatre of war as the result of a temporary attachment or draft conducting, for instance. It must always be accompanied by the British War medal.
The Territorial Force War Medal could only be awarded to those who left the United Kingdom, but did not receive either Star. It must be accompanied by the British War Medal but not necessarily by the Victory Medal.
Gallantry Awards
-
Victoria Cross
During the Crimean War, there was a body of opinion that favoured the institution of a medal for acts of outstanding gallantry, and accordingly, in January 1856, Victoria signed a Royal Warrant creating the Victoria Cross. There are several books dealing with the institution of the VC, and several more list and detail all recipients of the Cross. A total of 1351 VCs have been awarded since 1856, plus three bars for a second award. Eight Crosses have been forfeited, the last in 1908. The VC is always named on the reverse, with the recipient’s details on the reverse of the suspender bar, and the date of the act in the reverse centre. These details are engraved. All awarded are listed in the London Gazette, and all have citations. In addition, there is always a great deal of research relating to each recipient in newspapers, regimental histories and so on. The great majority of VCs—some 830—were awarded to the Army; the Royal Navy received 107 and the Royal Air Force 31. The balance is made up by Commonwealth and Imperial Forces, with 4 being awarded to civilians. It is impossible to price more than one VC in a single figure, as so much depends on the citation, action and regiment of the recipient.
-
Distinguished Service Order
The DSO was instituted in 1886 in order to fill a gap that had long existed in rewarding officers below the rank of major for distinguishing themselves on active service; previously the CB was the only possible award, and was very rarely issued to junior officers. The DSO was to be awarded to both the Army and Navy. The first issue of the DSO was in gold, and these were awarded between 1886 and 1890. After 1890 the award was issued in silver-gilt; the obverse has carried four variations of the crown in the centre, and there are six types of reverse – VR, EVIIR, GVR, GVIR first and second types and EIIR. The DSO has always been issued unnamed, although from about 1940 the year of award has been engraved on the reverse of the lower suspension bar. Approximately 150 of the gold VR types were issued. Some 1,150 silver-gilt VR awards were issued for the Boer War. It is not known exactly how many EVIIR types were issued, but they are rare. During the First World War approximately 9,000 DSOs were issued, with about 770 first bars and 75 second bars. There were also 7 DSOs with three bars. Between the wars some 160 DSO were awarded for various campaigns, with 16 first bars. In the Second World War some 4,900 DSOs were awarded, with 500 first bars, 59 second bars and 8 third bars. Since 1945 about 170 have been awarded with 20 first bars. There are generally no citations in the London Gazette for DSOs before 1914, though reference to dispatches and regimental histories may give a better picture of precisely why the award was made. In the First World War, many DSOs carry a specific citation, but there are periodic lists of recipients without citations. Since 1918 very few citations have been published and information must be sought away from the Gazette. Prices vary greatly depending on the citation and the theatre of award.
-
Imperial Service Order and Medal
Instituted by Edward VII in 1902, the Order recognises long and efficient service by both home and overseas civil servants. recipients usually had to serve for 25 years at home, 20 years in India or 16 years in unhealthy climates. The Order consists of a Breast badge in the form of a gold circular plaque bearing the Royal and Imperial cypher, surrounded by the inscription ‘For Faithful Serrvice’. For male recipients the plaque is mounted on a seven point silver star surmounted by a crown. For women it is enclosed within a silver laurel wreath. The ribbon is watered red with a central light blue stripe, and women normally reveive the insignia on a bow. There is only the one class and the holders are known as Companions (ISO). Women were admitted from 1908 and, as only about 5 awards are made to them annually, the ladies’ type badge is very scarce. It is understood that new dies showing a Queen’s crown were made only within the last five years. As the Order is now to fall into disuse in the United Kingdom, following the egalitarian reforms of Prime Minister John Major, this version will be extremely rare. The medal was instituted at the same time as the Order for those manual grades of the service not eligible for the Order. At first the only difference between Order and Medal was the central plaque bearing the Royal cypher which was gold for the Order and silver for the Medal. However, in 1920, the design of the Medal was changed to become a circular silver medal bearing the head of the Sovereign on the obverse and a symbolic design on the reverse above the words ‘For Faithful Service’. All medals are named and awards of the Order and Medal are published in the London Gazette.
-
Indian Order of Merit
Originally known simply as the Order of Merit, this award was created by the Honourable East India Company in 1837, making it the oldest in this catalogue. However, it did not become an official British award until the take over of India by the Crown after the Mutiny in 1857. The word ‘Indian’ was added in 1902 when the British Order of Merit was introduced.
Instituted in three classes, it could be awarded to all ranks for conspicuous gallantry in the field and possession entitled the holders to higher pensions on retirement. In 1902 a civil division was also introduced. When Indian troops became eligible for the award of the Victoria Cross in 1911, the military first class was abolished and the remaining classes renumbered. The civil division was reduced to a single class in 1939 and the military followed suit in 1944.
The design of the award is a simple eight pointed star in gold or silver with a central enamelled circle bearing crossed swords and the legend ‘Reward of Valor’, ‘Reward of Gallantry’. or ‘For Bravery’. The ribbon of the military division is dark blue with crimson edges, and that of the civil division the reverse. After 1915, awards are published in the London Gazette.
-
Royal Red Cross Decoration
This decoration, to reward cases of special devotion in nursing the sick and wounded of the army and navy, was instituted in 1883 and was, until 1976, limited to females including foreign subjects. In November 1915, a second class award known as the Associate of the Royal Red Cross was introduced and in December 1917, a bar to the first class was instituted. The bar is not available for the second class award, promotion to first class being the normal route upwards. In 1920 a new provision allowing for the award of the decoration for ‘some very exceptional act of bravery and devotion at her post of duty’ was introduced.
Apart from the initial 31 awards, which are believed to be of gold, the first class is a silver-gilt cross patee with the centre of each arm enamelled crimson. Upon the four arms are the words FAITH HOPE CHARITY 1883. In the centre is the bust of the Sovereign. The reverse is plain except for the central medallion which bears the appropriate Royal and Imperial cypher. The second class decoration is similar but of silver enamelled red. The words FAITH HOPE CHARITY and the date of foundation appear on the reverse. From 1938 both classes have the year of award engraved on the reverse lower arm. The ribbon for both classes is the same, dark blue with red edges. Though it is always issued in bow form, the decoration may be worn from a straight ribbon when mounted with other medals.
All awards, except those honorary ones to foreigners, are published in the London Gazette. There are no citations. Since its institution only about 1.850 of the first class have been awarded and about 100 bars. About 6,600 of the second class have been issued.
-
Distinguished Service Cross
Instituted in June 1901 as a reward for Warrant and Subordinate Officers of the Royal Navy, as these ranks were not eligible to receive the DSO. Originally called the Conspicuous Service Cross. Only eight CSCs were awarded for China and South Africa, including three to Gunners (warrant rank) and five to Midshipmen (subordinate rank). The CSC is thus excessively rare. In October 1914 there were two major changes to the CSC: firstly it was renamed the Distinguished Service Cross, and secondly the rules on eligibility were changed so that officers below the rank of Lieutenant-Commander could receive it. In 1931 the Merchant Navy was made eligible for the DSC in certain circumstances. There are five types of obverse: EVIIR (on the CSC), GVR, GVIR first and second types, and EIIR. The reverse of the DSC is common to all issues, but from 1940 onwards the year of award was engraved on the lower limb. During the First World War approximately 1700 DSCs were awarded, with about 90 first bars and 10 second bars. Between the wars only 7 DSCs were awarded. In the Second World War some 4500 DSCs were awarded, with 430 first and 44 second bars. One medal was issued with three bars. A very small number of Army and RAF Officers received the DSC. Since 1945 some 90 DSCs have been awarded, with 15 first and 5 second bars. All recipients are listed in the London Gazette, but apart from some First World War arards, citations are not generally published in the Gazette.
-
Military Cross
Instituted in December 1914 as a reward for gallantry for officers of the rank of Captain or below, and for warrant officers. Officers over the rank of Captain were eligible for the DSO. The reverse of the MC is common to all issues and is usually plain. From 1940 onwards the date of award was engraved on the lower limb of the reverse. There are four different obverse issues: GVR, GVIR first and second types, and EIIR. The MC was always issued unnamed, although some recipients had the reverse engraved privately. A bar was awarded for each further award of the Cross; there were four recipients of the MC and 3 bars in the First World War, with 170 2-bar awards and approximately 3000 first bars. Between 1914 and 1918 there were just over 37,000 awards of the MC. Between the wars there were about 350 awards for various campaigns, together with 30 first bars. In the Second World War some 10,000 Crosses and 500 first bars were awarded. Since 1945 about 600 Crosses and 28 bars have been awarded. All awards of the MC are listed in the London Gazette. A majority of awards for the First World War are accompanied by citations, but after 1920 few citations appear in the London Gazette. Prices vary depending on the regiment, citation and action.
-
Distinguished Flying Cross
The DFC was instituted in 1918 as an award to officers and warrant officers who displayed courage or devotion to duty whilst flying in active operations. The design of the obverse is common to all issues, whilst the reverse centre has one of four cyphers: GVR, GVIR (first type GRI, second type GVIR), and EIIR. For services in the First World War there were awarded approximately 1,100 DFCs, with 70 first bars and 3 second bars. During the Second World War some 20,000 DFCs were awarded (making the DFC the commonest award for the war), with approximately 1500 first bars and 42 second bars. Between the wars about 130 DFCs were awarded, plus 20 first bars and 4 second bars. Since 1945 about 260 DFCs have been awarded, with 25 first bars and 3 second bars. Citations for a majority of awards are available, but difficulties are encountered in obtaining details for some First World War and post-1945 awards. The DFC is issued unnamed, but GVIR issues are usually found with the year of issue engraved on the reverse of the bottom limb.
-
Air Force Cross
Instituted in June 1918, the AFC was awarded to officers and warrant officers for courage or devotion to duty whilst flying, though not in active operations against the enemy. From 1938 the year of issue was engraved on the reverse lower arm of the Cross. though usually issued unnamed, there is now provision for engraving the recipient’s name on the reverse when awarded for gallantry. There are four varieties: GVR, GVIR first and second types, and EIIR. Approximately 680 were awarded for the First World War, and 2,000 for the Second World War. 160 were awarded between the wars, and approximately 2,000 have been awarded since the Second World War. Some first bars were issued, and there have been about 20 awards of a second bar. Generally there are no specific citations in the London Gazette, although some Gazette entries give some indication of the nature of the recipient’s services.
-
The Order of British India
This Order was established in 1837 by the Hon. East India Company, in two classes, to reward long and faithful service by Indian Officers. members of the first class received the title of ‘Sirdar Bahadoor’, and those of the second class, that of ‘Bahadoor’.
The badge of the first class consists of a gold star of eight radiated points upon which is a central medallion showing a gold lion on a light blue enamel ground, within a dark blue border bearing the title of the Order, the whole surmounted by a crown. The badge of the second class is similar but slightly smaller, has no crown and the centre is enamelled entirely in dark blue. Both classes were worn at the neck suspended from a ribbon that was originally light blue, but changed in 1838 to crimson. The design of the first class was changed slightly in 1939 when the whole centre was enamelled in light blue. When the ribbon only was worn on undress uniform the classes were differentiated by two narrow light blue stripes for the first class, and a single central stripe for the second class. It was not until 1945 that these ribbons were worn with the insignia.
-
Kaisar-i-hind
Instituted by Queen Victoria in 1900 for any persons, without distinction of race, occupation, position or sex who distinguished themselves by important and useful service in the advancement of the public interest in India. The fist class, in gold, was awarded by the Sovereign upon the recommendation of the Secretary of State for India; the second class, in silver, was awarded by the Viceroy and the third class in bronze, introduced in the reign of george V, was also awarded by the Viceroy. A dated bar was available for further service. The award became obsolete in 1947.
The award is an oval badge measuring 1.75 by 1.375 inches. The obverse shows the Imperial cypher within an ornamental band, surmounted by the Imperial Crown. The reverse has the legend KAISIR-I-HIND on a scroll against a floral background, around which is a band carrying the words FOR PUBLIC SERVICE IN INDIA. The decoration is attached to a ribbon by a horizontal wire loop brooch attached to the top of the crown by a link. There is a top ribbon suspender bar carrying a floral design, without which the decoration is not complete. The ribbon is plain blue, ladies receiving their awards on a bow. Awards are normally published in the London Gazette, but a far more convenient and complete listing will be found in the annual issues of the Indian Office List.
-
Albert Medal
Instituted in 1866 for heroic actions in saving life at sea, when the rescuer’s own life was at risk. the medal was to be awarded in two classes – First Class (Gold) and Second Class (Bronze). The recipient was to be recommended to the Queen by the President of the Board of Trade. In 1877 the award of the medal was extended to cover awards for saving life on land; the two classes were kept for this issue, but the anchor on the obverse is omitted and the enamelling is in crimson, as opposed to blue enamel on the maritime issue. The medal is engraved on the reverse in various styles, and includes details of the recipient, the act of bravery and the date. Up to 1970, 69 gold and 491 bronze medals have been awarded in all. Citations are usually given in the London Gazette, and records are kept of awards by the Board of Trade. Awards to military personnel tend to fetch higher prices than those to civilians.
-
Distinguished Conduct Medal
Instituted in 1854 to recognise “distinguished, gallant and good conduct” by troops in the Crimea. At first intended to be issued on a quota basis for each regiment, due to the fixed amount of money available for the accompanying annuity. There are eight issues, all having a common reverse: VR, EVIIR, GVR, GVR crowned head, GVIR first and second types, EIIR first and second types. All issued DCMs are named, and there are a variety of types of naming: however, virtually all awards since 1914 are impressed. two types of second award bars have been issued, the first type has the date of the second award on it, with the second type bearing laurel leaves. The early dated bars are rare. DCMs have been issued for almost every campaign in which the Army has participated; nearly 25,000 were issued for the First World War, but only 1900 for the Second World war. Apart from the two wars and the Boer and Crimean Wars, few DCMs have been issued for any one campaign. There are generally no citations in the London gazette for DCMs before 1914, and reference must be made to regimental Histories and other works in order to find the details of the services of the recipient. After 1914, most DCMs appear in the London gazette with a citation, although there are periodic lists of recipients which do not include citations. between the wars there are generally no citations in the Gazette, and since 1939 DCM awards in the gazette do not carry citations.
-
Distinguished Conduct Medal (colonial and dominion)
Instituted in 1894 to reward members of the Colonial Forces in the same way as Imperial troops. The medal is similar to the British DCM, but has the Colony over the top of the reverse inscription. Four types are known: Canada, Natal, King’s African Rifles and West African Frontier Force. The Canadian issue is extremely rare, only one being known. The Natal issue comprises perhaps ten medals; nine for the Natal Rebellion 1906, and one known for the Boer War. The KAR issue was awarded up to 1942, with approximately 180 medals and 7 bars awarded. The WAFF issue ran to about 85 medals and 6 bars. In 1942 it was decided to replace the KAR and WAFF issues with the Imperial issue. These awards, which are all rare, are usually in the London Gazette but are often not differentiated from normal DCMs. The KAR history and East African Gazettes can provide information of the two African issues.
-
Conspicuous Gallantry Medal (Royal Navy and Royal Air Force)
Instituted in 1855 as a reward for gallantry for the Royal Navy and Royal Marines, and intended to be a counterpart to the DCM for the Army. The first issue was made to ten recipients for gallantry in the Baltic and Crimea. These medals had the date ‘1848’ on the obverse under the Queen’s bust; in order to save money, the MSM die was used, with the wording on the reverse removed and ‘Conspicuous Gallantry’ engraved in the reverse centre. The naming was in engraved serif capitals. After a lull of some 18 years, the medal was re-instituted in 1874 with a batch of awards for Ashantee. From this date the medal was issued with the following obverses: Victoria (without date), EVIIR, GVR and GVIR. About 50 of the second Victorian issue were awarded, with 2 EVIIR medals, 110 GVR issues, and 72 GVIR issues. Only one second award bar has been awarded. In 1942 the award of CGM was extended to the RAF to recognise gallantry whilst flying in operations against the enemy. 103 CGMs (Flying) were awarded for the Second World War, and one has been awarded for Vietnam. From 1901, nearly all CGMs have citations, although before this date information on acts of gallantry varies somewhat.
-
Kings or Queens Police or Fire Medal
Instituted by Royal Warrant in 1909 as a reward to members of both the Police and Fire Services for courage and devotion to duty. In 1940 the title of the award was changed to the King’s Police and Fire Services Medal but it reverted to the Queen’s Police medal upon the institution of a separate award for the Fire Service in 1954. There is provision for bars to be issued for subsequent awards. There are six obverse types: EVIIR, GVR, GVR crowned head, GVIR first and second types and EIIR. There are four reverse types, the original having no wording to show the grade of service for which it was issued. In 1934 two new reverse types were substituted, bearing the words ‘For Gallantry’ or ‘For Distinguished Service’ in the exergue. In 1954 a new reverse die was cut with the words ‘For Distinguished Police Service’ within a border around the rim. Between 1909 and 1911 there were about 100 awards, no differentiation being made between gallantry or distinguished service. There were about 1900 awards of the GVR first type, this total including both gallantry and distinguished service. other gallantry reverse awards were approximately 350 with the GVR crowned head obverse, about 440 with the first type GVIR and about 50 with the GVIR second type obverse. Only 23 awards for gallantry have been made with the EIIR obverse as against well over 1200 for distinguished service in the same period. There are approximately 53 first bars and but one second. Naming is in engraved seriffed capital letters with name, rank and service. All awards are published in the London Gazette but citations are rarely given though many are available in the Public Records Office. The ribbon was originally dark blue with narrow silver stripes at each edge, but in 1916 a further centre stripe of silver was added. From 1934 gallantry awards were distinguished by a thin stripe of red through the centre of each silver stripe.
-
Edward Medal (MINEs)
Instituted in July 1907 to recognise gallant attempts to save life in mines and quarries anywhere in the Empire. Two classes were created: the First Class medal was in silver, and the Second Class was in bronze. The obverse bore the head of the reigning monarch, and the reverse was common to all issues. There are six obverse types: EVIIR, GVR, GVR crowned head, GVIR first and second types, and EIIR. All issued medals are engraved in upright serif capital letters, and issues from the 1930s onwards have in addition the date, and sometimes the place, also engraved on the rim. Only a few – perhaps two – bars were awarded for a second act of gallantry. Approximate numbers issued: silver—77, bronze—318. All awards are notified in the London Gazette, and usually citations are given, the exception being some awards during the First World War. There are also files at the Home Office and Colonial Office which relate to many awards, and contain letters and accounts on which the award is based. The prices below are for each issue, the first figure being the First Class, and the second figure for the Second Class.
-
Edward Medal (Industry)
Instituted in December 1909, and created alongside the Edward Medal (Mines). Awarded for acts of gallantry which accurred in an industrial context. As with the Mines issue, two classes were created: First Class (silver) and Second Class (bronze). The Obverse bore the head of the reigning monarch, of which the following six types were issued. EVIIR, GVR, GVR crowned head, GVIR first and second types, and EIIR. In addition, there were two reverse typoes issued: the first was issued 1910-11, and the secondf has been issued since 1912. All issued medals are engraved in upright serif capital l;etters, and issues from the 1930s onwards have in addition the date, and sometimes the place, also engraved on the rim. No second award bars were issued. Approximate numbers issued: silver—25, bronze—1163. All awards are notified in the London Gazette, and usually citations are given, the exception being some awards during the First World War. There are also files at the Home Office and Colonial Office which relate to many awards, and contain letters and accounts on which the award is based. The prices below are for each issue, the first figure being the First Class, and the second figure for the Second Class.
-
Indian Distinguished Service Medal
Instituted in June 1907 as a reward for distinguished service for Indian officers, NCOs and men of the Indian Army. Whilst the reverse remained common to all issues, there were four obverse types EVIIR, GVR Kaisar-I-Hind, GVR crowned head, and GVIR. From 1917 onwards a second act of gallantry was recognised by the award of a bar. issued IDSMs are named in a variety of styles, both impressed and engraved. Approximate numbers awarded: EVIIR – 140, GVR first type _ 3,200, GVR second type – 140, GVIR – 1,150. 25 bars were awarded for the First World War, and 10 for the Second World War. between the wars about 15 bars were issued. There are several sources in which notifications appear; many, but not all, IDSMs awarded for the First and Second World War appear in the London Gazette, but citations are not given. Indian Army Lists 1907-31 contain a roll of serving and retired recipients of the IDSM. Some notifications appear in the gazette of India, although no citations appear. Regimental histories often list awards, and sometimes give details.
-
Distinguished Service Medal
Instituted in October 1914 to supplement the CGM, and was to be awarded for acts of bravery of a lesser degree than those eligible for the CGM. A bar was sanctioned in 1916 for those who received a second award of the medal. In the Second World War, eligibility was extended to Army and RAF personnel serving on board ship, and also to the Merchant and Dominion Navies. Whilst the reverse of the DSM is common to all issues, there are five obverses: GVR, GVIR first and second types, and EIIR first and second types. All issued DSMs are named, those for the First World War in impressed capitals and those for the Second World War in both impressed and engraved capitals. 4,100 DSMs were issued for the First World War, with 67 first bars and 2 second bars. ten DSMs were awarded between the wars. In the Second World War there were approximately 7,100 DSMs issued with 152 first bars and 3 second bars. One medal with three bars was also awarded. About 50 DSMs were issued 1940-45 to the Maritime Royal Artillery, and 23 were awarded to the RAF. Since 1945 there have been about 50 DSMs awarded, with one first bar. All awards of the DSM are listed in the London Gazette, but in general there are few citations, except for the early part of the First World War. However, the 1914-18 awards often have the name of the ship and a date after the other naming details, and this is a useful starting point for research. Finding citations for 1939-45 awards is more difficult, but many do exist in Admiralty records. As with other awards, prices for DSMs awarded for famous actions – Jutland, Q-Ships, Russian Convoys, etc., are considerably higher. price below for GVR is for groups with named medals
-
Military Medal
Instituted in March 1916 as an award for NCOs and men of the Army for acts of bravery. Later extended to women who showed bravery under fire. There was also a provision for the award of a bar for each further act of bravery. In the First World War the MM was awarded to a few recipients from the Royal Navy and Royal Air Force. Some RAF personnel also received the award in the Second World War. There are six obverse types: GVR, GVR crowned head, GVIR first and second types, and EIIR first and second types. In addition, there are four different reverses in that each monarch had the relevant cypher in the reverse field. All MMs issued to British personnel are named, usually in impressed capitals, although some awards to Indian troops are engraved in plain capitals. During the First World War some 115,000 awards were made, with 5,800 first bars and 180 second bars. There was one award of the MM and three bars. Between the wars there were some 260 MMs for various campaigns. The Second World War saw the award of 15,000 MMs with 164 first and 2 second bars. Since 1945 about 700 awards have been made, plus 8 first bars. All issued MMs have a notification in the London Gazette, but only a very small number have citations in the Gazette. Citations for First World War awards are generally not available, although some details appear in Regimental Histories. Second World War awards often have citations from official sources.
-
Distinguished Flying Medal
The DFM was created at the same time as the DFC, and was awarded under the same general provisions as the DFC to reward NCOs and men for bravery whilst flying on operations against the enemy. All issued DFMs are named; the First World War awards were impressed in large serif capitals, and the Second World War awards were rather crudely engraved. there are five obverses issued on the DFM: GVR, GVR crowned head, GVIR first type, GVIR second type (from 1949), and EIIR. In addition there are two reverse types: the GVR issues have no date on the reverse, whilst the GVIR and EIIR issues have the date ‘1918’ at the top of the reverse. Approximately 105 DFMs and two first award bars were issued for the First World War; between the wars some 80 medals and 2 first award bars were issued. In the Second World War, 6,600 DFMs were issued, with 60 first bars and 1 second bar. The recipient of the two-bar DFM also had the DSO and AFC. Since the Second World War approximately 100 DFMs have been issued. Availability of citations varies: about half of the First World War issues have citations in the London gazette, whilst only a third of the inter-war awards have citations in the gazette. There are a substantial number of citations for Second World War awards, but of those DFMs awarded since the war, only 10 have Gazette citations.
-
Air Force Medal
Instituted at the same time as the AFC, this medal was awarded to NCOs and men for courage or devotion to duty whilst flying., though not in active operations against the enemy. All awards to British personnel are named – in large serif capitals. (First World War), or in a rather crude engraved style (Second World War). There are five varieties: GVR, GVR crowned head, GVIR first and second types, and EIIR. In addition, the GVIR and EIIR issues have the date ‘1918’ in the reverse left field. Approximately 120 medals and 2 bars were issued for the First World War, and 259 medals for the Second World War. Since 1946 nearly 400 medals have been awarded. Almost all AFMs are listed in the London Gazette without citation, and often it is necessary to undertake in-depth research to find the reason for the award. The AFM was occasionally awarded to Commonwealth Air Forces, and a few have been issued to the Army Air Corps.
-
Constabulary Medal (Ireland)
Instituted in 1842 by the Irish (later Royal Irish) Constabulary as a reward for its Constable whose conduct was exemplary and who showed a high degree of “intelligence, tact or courage”. The first medal was awarded in 1848 and the last in 1922 when the force was disbanded. At first, the suspender on the medal was the fixed bar type but this was later altered to a swivelling wire suspender. The obverse design varies, early issues having the female figure on the harp and the Queen’s crown and later issues having the King’s crown and a different type of harp which omits the figure. On the reverse is engraved the name and rank of the recipient with the date, and sometimes place, of award. Approximately 315 of these medals were awarded, the majority for the 1916 Easter Rising and the 1920 “Troubles”. Seven men received a second award, either in the form of a second medal or a bar. recipients can be found in the Constabulary Lists and sometimes detail of award can be found in Irish newspapers. Price varies according to the date and detail of the award.
-
Allied Subjects Medal or Prisoner of War Helper's Medal
The medal (never formally given a name) originated in proposals early in 1919 to recognise the services of Allied subjects who had assisted British prisoners of war or evadees during the First World War. A year was spent in argument between the War Office and the Foreign Office while the first design, by the famous illustrator Edmund Dulac, was rejected. But eventually a consolidated list of names was forwarded to the King by the Foreign Office on 12 November 1920 and further awards were made in 1921 and 1922. The medal was struck in silver and bronze. The obverse has the sovereign’s head and the reverse shows the figure of humanity standing over a steel-helmeted British soldier offering him a cup of water, with ruins of war in the background. The ribbon is red with a light blue centre flanked by stripes of yellow, black and white and the suspender is the same as the Victory Medal. The names of recipients were not gazetted and the medals were issued unnamed; but details appear in the list of November 1920, in a supplementary list of 8 October 1921 and a few scattered references at the Public Record Office. A total of 134 silver and 574 bronze awards were made, these figures including 56 and 247 respectively to women. Nearly all the recipients were French or Belgian.
-
Sea Gallantry Medal
This medal, the only gallantry award sanctioned by Act of Parliament, was instituted in the Merchant Shipping Act of 1854. The Act mentioned the provision of money as a reward for preserving life at sea, and in 1855 the Board of Trade approved the award of silver and bronze medals for gallantry in this field. The first (Victorian) issue of this medal was known as the “Board of Trade Medal for Saving Life”. It was a large piece, without suspension; there were two types – the ‘Gallantry’ type (where the recipient risked his own life) and the ‘Humanity’ type, where the recipient’s life was not in danger. The former had the word ‘gallantry’ mentioned on the obverse, whereas the latter did not. In 1903 Edward VII ordered that the medal should be reduced in size and be designed for wearing, bringing it into line with other gallantry awards. This smaller style of medal was issued in six types: EVIIR first and second types, GVR, GVIR first and second types, and EIIR. The reverse was common to all types. Naming is engraved, with details of the recipient, ship and the date. The following numbers issued are approximate, the first being for silver awards, the second figure for bronze awards; VR–500/650; EVIIR first (large) type–19/33; EVIIR second (small) type–70/78; GVR–385/370; GVIR first type–7/13; GVIR second type–none/6; EIIR–18/8. Lists of recipients appear in the London Gazette from 1926, mostly with citations. However, other sources exist from which details of most awards before 1926 can be extracted.
Great War Handbook - A Guide for Family Historians & Students of the Conflict
-
Geoff Bridger, author of the Great War Handbook
Geoff Bridger, author of the Great War Handbook has established a wide reputation as a leading authority on the Great War. He has made a particular study of army life and the experience of the ordinary soldier during the conflict, and is well known for his lectures on the subject. The book is published by Pen and Sword Books Limited www.pen-and-sword.co.uk
Geoff has an extensive knowledge of databases and is editor-in-chief of the records that you will find on The Naval & Military Archive, including the Campaign Medals of The Great War, The Silver War Badge and Soldiers Died in the Great War.
If you would like to read more of Geoff’s Handbook copies may be purchased online at www.naval-military-press.com -
British Expeditionary Force: BEF
A global term for all the British Army units in France, Flanders and Italy in the Great War. There were only ever two commanders-in-chief. Until 19 December 1915 Field Marshal Sir John French commanded it. From noon that day General (later Field Marshal) Douglas Haig took over and remained in post for the remainder of the war.
-
Army
An organised body of men armed for war and commanded by a general. It consisted of two or more corps and other supporting units and services including artillery, engineers, medical personnel, veterinary services and transport. By March 1915 there were two armies in the BEF. By 1918 this total had risen to five.
-
Corps
A formation consisting of two or more divisions and also supporting forces, responsible to the Lieutenant General in charge. An army corps’ identifying numbers were in Roman numerals.
Also the name used by units such as Army Service Corps, Royal Army Medical Corps, etc. These two uses of the word ‘Corps’ must not be confused.
-
Division
This was almost a miniature army under the command of a Major General. Besides three brigades of combat soldiers, it contained all necessary support units to enable it to fight independently. Such units would include, for example, artillery, ambulance, engineers including a signalling section, and transport. Divisions were frequently moved during the war and came under the command of different corps or armies. There were also cavalry divisions. The regular army in 1914 was comprised of eight divisions, numbered one to eight, but subsequently four more were formed from reservists and men returning from overseas stations. They became the 9th, and 27th to 29th Divisions. Full details of the composition of each division are in the Order of Battle of Divisions.
When out of the line a division was usually at rest and/or training. It was re-sorted, reinforced and re-equipped prior to being re-assigned to another, perhaps quieter or perhaps not, sector of the front. Brigades were sometimes switched between divisions to bolster a weaker one or to assimilate less experienced troops into a more seasoned one.
Medium and heavy mortar batteries came under divisional control and were operated by men of the Royal Field Artillery. These batteries were usually numbered to correspond to the parent division. For medium batteries, there were normally three, that number was prefixed by X, Y or Z. For the heavy battery the prefix was V.
-
Brigade (Infantry)
In 1914 it was a formation of four battalions commanded by a Brigadier General and assisted by headquarters staff. A further territorial battalion would sometimes be attached to a brigade. Machine gun and light trench mortar units were controlled at brigade level. Around March 1918 the brigades were reduced in strength from four to three battalions because of shortages of manpower. Several battalions were amalgamated at the same time for the same reason.
-
Regiment
Many soldiers feel they owe allegiance to their regiment. But what exactly is a regiment? It is rather hard to define but simplistically it could be said to be an umbrella organisation, steeped in tradition, commanded by a colonel and comprised of battalions of soldiers plus the Depot, regimental silver and the goat or other mascot. Unlike Germany, British regiments never fought as a body. Its battalions were dispersed across the divisions. In peacetime the regular battalions were often on overseas stations and its territorial battalions were spread across their recruiting areas in their respective companies. Only the Depot with perhaps 100 men, the colonel, goat etc remained in the main barracks in its garrison town. But that is where the esprit-de-corps was centred. Soldiers spoke with pride of their regiment and then added that they were in a particular battalion.
-
Battalion
The infantry battalion was the principle-fighting unit of the British Army during the Great War. As part of a Brigade, which was in turn part of a Division, a battalion was ordinarily commanded by a Lieutenant Colonel. He was assisted by twenty-nine officers and a further 977 men made up his command. Thus, notionally, a battalion had 1007 officers and men. The reality was somewhat different for battalions often went into battle fielding but a few hundred in total. In addition to the men, a battalion had under its command many horses, wagons and carts to carry ammunition and supplies. The diminutive machine gun section was radically altered as the war progressed. (For details see the Machine Gun Corps). Infantry battalions frequently moved between brigades during the war. Each battalion was divided into four companies.
New Army battalions were assigned to existing regiments and numbered from where the regular, reserve and territorial battalions ceased but with the addition of the word ‘Service’ to their number. Territorial battalions often, but not always, started in the numbering sequence at four and there were often at least two of them. As recruits often elected to join the territorials rather than the Regular Army (New Armies) there were more men than places available. To accommodate this situation new battalions were created and given the same number as the original but with the addition of a prefix. Thus one finds the 1/5th (originally just the 5th), 2/5th and even the 3/5th. Altogether including regular, reserve, territorial, new army etc there were 1743 British infantry battalions during the Great War but many did not serve overseas.
Not all battalions were primarily comprised of fighting soldiers – although all were armed and fought if required. Several battalions were designated for pioneering or labouring tasks whilst others guarded important installations at home and abroad.
-
Pals Battalions
It was thought men might more readily enlist if they knew they could serve with their chums - maybe from work or neighbourhood. Men like Lord Derby and the then Major General Sir Henry Rawlinson appealed for like-minded groups to enlist together. Lord Derby, known as “England’s best recruiting ‘sergeant’”, coined the term ‘Pals’ when he was recruiting in Liverpool on 28 August 1914. He said, this should be a battalion of pals, a battalion in which friends from the same office will fight shoulder to shoulder for the honour of Britain and the credit of Liverpool. Many similar Pals battalions were formed, with arguably, the Accrington Pals being the most well known. Unfortunately, if a Pals Battalion suffered heavy casualties in a battle it meant that a small community at home or at work was particularly hard hit. Whole streets could lose their men-folk overnight.
-
Cadre
A basic unit of a few officers, NCOs and men kept out of the battle, usually with the transport, to form a nucleus for expansion or recovery when necessary, such as when the battalion had devastating losses in battle. The term ‘decimated’ is often incorrectly used to suppose massive losses; indeed some confuse it with the phrase ‘wiped out’. It actually means one man in ten being a casualty. Many units suffered far heavier losses than that.
-
Company
As one quarter of the fighting arm of a battalion, it notionally comprised six officers and 221 men. A major or a captain ordinarily commanded the company. Each company was usually entitled: A, B, C, or D. Some battalions however used instead the letters W X Y and Z.
-
Platoon
This was one quarter of a company. A lieutenant or second lieutenant usually commanded it. But frequently in battle an NCO would assume command if the officer was killed.
-
Section
Each platoon was divided into four sections, each commanded by an NCO.
-
Lines of Communication
This term referred to the vast number of soldiers, in hundreds of units in rear areas, dealing with the transport and supply of materials for the fighting soldiers. Their jobs involved working in, at, or on: docks, quarries, roads, forestry, railways, repair workshops, general provisions and petrol supply, hospitals, prisons, ambulance trains, hospital ships etc. The actual lines of communication were the systems of rail, road and navigable waterways links between the army and its base or bases.
-
Casualty clearing station CCS
Motor ambulance convoys, sometimes assisted by the field ambulance, would then take the man to the next link in the medical chain - the ‘casualty clearing station’. A casualty clearing station was generally a large, fully equipped, often tented hospital set up around ten miles behind the front. It rarely kept patients for more than a few days. Their primary job was collection of casualties from allocated field ambulances, to be able to tackle more complex conditions and prepare the patient for dispersal to the next level. They were able to x-ray and perform major operations on a lot of men, under far more favourable conditions than those at a field ambulance. Often, after a battle, a great many casualties required expert medical attention simultaneously. The CCS was better equipped and staffed to deal with that situation, although inevitably delays in receiving aid occurred. In addition to surgery they gave much needed comfort and stabilised the patient ready for his onward journey. The patient could be returned to his unit if sufficiently recovered. Or he could be placed upon an ambulance train, hospital barge or other conveyance and taken onwards.
Any echelon could be by-passed if circumstances warranted it. Thus, for example, casualties deemed by the doctors to have no realistic chance of survival, were retained at the place they were so assessed and placed in the local moribund tent or ward. There they would be given every possible comfort, nursing care and painkillers, but effectively, left to die. Unfortunately patients with severe abdominal or head wounds were often untreatable given the conditions at the time. Over 43 per cent of those wounded in the abdomen subsequently died. With the huge numbers of more lightly wounded men flooding in, who stood a greater likelihood of survival, available resources were allocated to them in preference to those most likely to die anyway. It was harsh, but it was during a war about a century ago.
Further treatment and long term care would be undertaken at huge, fully equipped general, stationary or base hospitals often located near the large costal towns such as Boulogne, Calais and Etaples. These hospitals specialised in certain injuries and in consequence the patient would, hopefully, be sent to the appropriate one for his condition. The main remaining type of hospital was the home hospital. And to be sent there was the wounded soldier’s greatest desire – back home to Blighty! [Blighty derives from the old army in India where belati was Hindi for ‘far away’ (home)] Field Service Post Cards were provided for the wounded but strict rules applied. Note the patient could only say how well he was! Sadly death sometimes preceded that letter ‘to follow at first opportunity’.
-
Billets
When away from the trenches, soldiers were housed in whatever accomodation could be found. Often barns and other farm buildings were commandeered (and paid for) by the army and the men bedded down on straw if they were lucky. Occasionally better quarters were available. Officers generally found houses to requisition and sleep in. When away from the front the food improved considerably with the availability of the company cookers. More elaborate cleaning of the body, weapons, ammunition and kit was undertaken. A favourite place for soldiers’ baths was the local brewery where old vats were commandeered. Water was heated (if they were lucky) and as many men as possible piled in at once. Despite the gradual solidification of the water, the grubby soldiers genuinely relished the opportunity to bathe. Whilst naked, sometimes to the glee of the local girls, their uniforms were disinfected and fresh underclothes were issued – very often of a totally different size to the ones removed. And finally, when all this was done, new tasks were found to keep the soldier busy.
-
Desertion
Despite the potentially severe punishments, including execution, that could be handed down there were 114,670 instances of desertion from the Army. Many rejoined; some deserted more than once; 266 paid the ultimate penalty. No doubt some got completely away to lead a secret life as a fugitive.
-
Discipline
This was strictly enforced throughout the war and backed up by the severest penalties for transgressions. Whilst soldiers did not salute officers in the trenches there was no fraternisation either. Once away from the front, the full pomp of military life resumed and differed little from that in barracks and parade squares back home. Altogether 304,262 officers and men appeared before a court martial during the war. When one considers that represents just over three per cent of the total mobilized from Britain and the Commonwealth the discipline record of the army is extremely good. Not all those charged were found guilty of course. Whereas imprisonment, usually with hard labour, was an option for courts martial, it was more usual for fines to be imposed for minor offences and Field Punishments No 1 or 2 for more serious matters. These involved, for No 2, being physically restricted in shackles and, for No 1, additionally chained uncomfortably to a fixed object, such as a wagon wheel, for two hours a day. This could continue for three out of every four days – maybe for between three weeks and three months. When not restricted the man was subjected to hard labour and loss of pay and privileges. In total 80,969 sentences to Field Punishment No 1 or 2 were passed.
The most severe crimes were subject to the death penalty. Officers were subject to the same discipline but it seems to have been applied less vigorously. Some 1,085 officers were dismissed from the army. That is not altogether a soft option for they could then be conscripted as private soldiers.
-
Prisoners of War
Aside from the very real risk of being killed or wounded there was a possibility of being captured by the enemy and made a prisoner for the duration of the war. It was often difficult to surrender alive but once the surrender had been recognised most prisoners were well treated. Many were malnourished but that was mainly because of the sparsity of food in Germany. Some severely wounded men were repatriated home via the Red Cross in Switzerland but for the others, the length of their confinement was unknown. Officers were required, upon repatriation, to justify their capture. In total some 6,949 British officers and 166,626 other ranks (this includes officers and men from the Royal Navy) were reported as having been prisoners of war or interned in neutral countries. Altogether 196,318 Commonwealth officers and men were captured and of these 16,402 died in captivity.
-
Rations
Food was a very important part of a soldier’s life. The British soldier was adequately if not extravagantly fed. At least he was most of the time, but there were many occasions in the line when it was not possible for food to be brought to him. To guard against this very real possibility two days rations were taken into the line at each changeover.
When possible hot food was provided from field cookers – a small cart that could prepare enough hot meals for 250 men. At least the food was hot once. But by the time it had been carried, maybe a mile or more, over rough ground at night, I suspect the stew etc was at best tepid. As an alternative, basic foodstuffs were often brought to the frontline during the night by ration parties. This would generally consist of loaves of bread, jam, cheese and bacon. It was usually carried to the front in sandbags. The food was not wrapped and in consequence the cheese and bacon was usually quite hairy from the sacking and the bread rather resembled the mud it was frequently dropped in en-route. Soldiers were used to this and after grumbling – more about any delay in supply, rather than extra texturing to the food - proceeded to eat it. Improvisation was the order of the day.The bacon was cooked on tiny stoves fuelled by special solid pellets or charcoal, or candle wax or any wood or other fuel scrounged locally. For example, in 1916 around 100,000 Ayrton fans were supplied in the fond hope that by wafting them they could dispel approaching gas clouds. They were useless for the intended purpose but, as the handles were wooden, they provided much needed fuel! Corned beef and army biscuits were also available but not much relished. The canned beef was monotonous and the biscuits extremely hard. A slightly more palatable alternative was Maconachie’s tinned ration of meat and vegetables, commonly called ‘M and V’. The Ticklers jam supplied was most often made from plums and apples – both plentiful in besieged Britain.
Water carts with heavy galvanised mugs chained to them were located in strategic places in rear areas for thirsty soldiers to grab a quick drink as they passed by. Water for the front line was usually carried up in former petrol tins. They were washed out prior to use as water carriers but nevertheless petrol had already seeped into the cans seams and forever tainted the water. In addition to its unpleasant taste it could have a detrimental effect upon the bowels!
The prescribed daily ration initially was:
1¼ lb (later reduced to 1 lb) fresh meat or 1 lb processed meat (corned or bully beef).
1¼ lb bread or 1 lb biscuit (army biscuits) or 1 lb flour.
4 oz bacon
3 oz cheese
2 oz peas or beans or dried potatoes.
Small measures of jam, sugar, salt, mustard, pepper and lime juice.
Up to 2oz tobacco and ½ gill [71ml] rum could be discretionally supplied.
A brief comparison of just three items of field rations between British, German and American troops is rather interesting, if not surprising. Each number is the daily ration in ounces. Those at Home and on Lines of Communication (except Americans) received less, especially meat and bread. They were the official figures. Frequently because of enemy action, or theft in the supply chain, the men at the front received far less than their full ration.
Item: Britain America Germany
Bread: 16 oz 16 oz 26.4 oz
Meat: 16 oz 20 oz 10.5 oz
Vegetables: 10 oz 20 oz 18 oz
Calories per day: 4,193 4,714 4,038
Many civilians received an average of not much more than 3,000 calories a day. That may sound good but one must remember that most were working long hours of hard manual labour. The composition of the food at home was filling but not particularly nutritious.
-
Shrapnel
One constantly heard the old tale, ‘grand-dad still had lots of shrapnel in him when he died. At one time they used magnets to try and pull it from his body.’ This cliché is strictly wrong. True shrapnel consisted of spherical lead balls, and lead is not attracted by magnets. The effect of being hit by one or more was roughly similar to being hit by rifle or machine gun bullets. Conversely shell splinter, jagged pieces of casing from disintegrating high explosive shells, could come in any shape or size. Some were minute whilst others were large razor-sharp chunks of high velocity steel that could sever a limb, or cause other horrific injuries instantly. And indeed magnets were tried in an attempt to remove them.
-
Snipers
The practice of sniping was not new in 1914. The Germans were exceedingly adept at it and dominated the activity for the first year of the war. Balance was not struck until Major Hesketh-Pritchard, a former big-game hunter, gradually introduced the art and the telescopic sighted rifles necessary to accomplish it. It was not just the weapon that was important. New skills in long range shooting and camouflage had to be learnt and practised. A skilful enemy sniper not only causes casualties, he also lowers morale considerably in his area of operations. The slightest exposure would invite a bullet, which invariably struck without warning or the chance to avoid it. Several snipers were credited with well over 100 ‘kills’. As prime targets themselves, many were in turn sought out and killed by enemy snipers.
-
Trenches, a summary
A trench was effectively a slot dug into the ground. Its purpose was to limit the effect of different projectiles and the blast effect of high explosive shells. They were the most common type of defensive position on the battlefields. The first real trenches, which were to form the opposing lines for well over three years of siege warfare on the Western Front, were constructed in September 1914 following the allied Advance to the Aisne. Before that, during the period of mobile warfare, when necessary individual soldiers dug hollows in the ground with their entrenching tools to get some protection from incoming small arms and artillery fire. [An entrenching tool is a personal issue small spade that frequently incorporated a short pick.] The ideal textbook front-line trench was about three feet four inches wide at the top, around seven feet deep with the sides cut as steep as possible, and tapering to about three feet wide at the bottom. It had raised areas at the front and back known respectively as a parapet and a parados. About eighteen inches of the width at the bottom incorporated a raised fire-step on the side facing the enemy. It did not leave much actual floor space for movement. The exact construction varied considerably and was heavily dependant upon the soil conditions. Often the sides were reinforced with corrugated iron, wickerwork hurdles, wire netting, timber or other convenient materials scavenged locally. Where sandbags were used, they were laid to precise specifications and stakes were driven through them at intervals to add strength and avoid collapse. Sandbags were normally only used where speed of construction was the first priority as they rotted after a while and in consequence their contents spilled out into the trench. In general terms the narrower the trench, the more protection it offered. After the lessons learned at the beginning of the war the trench bottoms were often floored with duckboards to aid travel and drainage of water.
Some trenches were at least partially covered with material to afford some protection from descending shrapnel and shell fragments, as well as the worst of the weather. The cover also made the trench more difficult to spot from the air. They were not popular however and most trenches – including all front-line trenches - were totally exposed to the elements. This of course risked death or harm from exposure. Outside the trench, earth was built up at both the front and rear. Often carefully, but unevenly laid sandbags were used for this purpose. Dummy trenches were also dug to confuse and entrap any invading enemy.
In Belgium and the northern parts of France the water table is very high – often only one or two feet below the surface. In these conditions it was not practical to dig deep trenches. Instead a shallow trench was dug and then earth built up in front of the trench to form high breastworks and thus give as much protection as possible. Most trenches were a compromise between the two main types.
Trenches were initially dug by infantry soldiers, mostly under cover of darkness. Later in the war planned trench lines – as opposed to the majority that evolved due to prevailing circumstances – were often dug by labour battalions or even members of the Labour Corps. Whenever possible the trenches were profiled to afford maximum concealment. From the diagram it will be seen that the trench system was comprised of several elements, some of which are briefly described below. Despite seeming haphazard, trenches were very carefully thought out to give the best possible protection to their occupants, whilst affording a good field of fire with which to engage the enemy. Their mutual support capacity with nearby emplacements was vital and consideration was also paid to their drainage potential. It was not desirable that soldiers should stand in waterlogged trenches if it could be avoided. Some trenches were on the reverse slope of a prominence to improve their defensive capabilities. These required forward saps for observation and to act as fire-bays. Dead ground, that is an area which cannot be covered by fire, was avoided at all costs. It could provide cover for an attacking force. Small excavations were frequently dug into the rear wall of the trench to contain a small fireplace for heating water and cooking breakfast. The schematic diagram of a trench system includes many of these terms.
-
Elements of a trench or trench system and a definition of trench terms
Barbed wire:
Inescapably linked to the maze of trench systems, and defending them from easy infiltration, were huge swathes of barbed wire. By 1915 these were not simple strands such as found surrounding fields at home but vast entanglements designed to be impenetrable. Belts of barbed wire stretched along much of the Western Front on both sides of No Man’s Land and it was regarded as both a blessing to be behind and a barrier to try to penetrate – depending upon whose wire one was contemplating.
The wire was fixed in position by vast quantities of stakes driven into the ground or suspended from specially designed screw-pickets. Coils of wire were expanded and fixed to the stakes. Another method, when rapid wiring was required, was the use of chevaux-de-frise – a pre-constructed obstacle of posts and barbed wire that could be carried into position, dumped and staked there.
The belts of wire varied enormously in height and depth but ideally were about three feet high and over thirty feet in depth [10 metres]. Usually a second band of similar dimensions was laid parallel to and further out from the first to keep enemy bombers at bay. Very often there was yet a third entanglement with a gap between it and the preceding one. A distance of around twenty yards from the front-line was generally left free of wire. These bands of intermeshed wire were so dense that they clearly show on aerial photographs taken from several thousand feet altitude. Single strands of wire, with tin cans containing stones suspended from them, were often set a few inches from the ground some distance from the front line trench. It was designed to catch an intruder attempting infiltration by night and attract the attention of sentries.
At night parties would frequently go out to try to penetrate the enemy’s wire and gather intelligence. Samples of the enemy wire were taken for analysis. Again, each night men would be sent out to repair and strengthen their own wire. Sometimes this led to confusion. In one instance, the then Lieutenant Philip Neame (15 Field Company Royal Engineers) sent a verbal message to supporting infantry, The R.E. are going out to wire. Don’t fire. The message that finally reached the machine guns was, Enemy in the wire. Open fire. The resulting mêlée, with both sides soon shooting at the unfortunate sappers, can well be imagined.
Before a major assault, gaps were made in one’s own entanglements to allow the troops through. The gaps were zigzagged in such a way as to be invisible from the enemy positions and marked out with tapes. Various methods were tried to destroy enemy wire defences but none were entirely successful. At best the wire was partially cut but still represented a considerable obstacle for the soldiers trying to get through it. High explosive shells usually lifted the wire into the air and dumped it back on the ground in a jumbled heap, making it more difficult to cut and cross through than the original. Developments in fuze design made the shattering of areas of barbed wire possible with certain mortar bombs, but that depended upon great accuracy and the opposing wire being relatively close. Another method used was to fire shrapnel shells set to burst just over the wire to attempt to cut it with the shrapnel balls ejected. None of these techniques worked well in action and they consumed vast quantities of shells and bombs in the process. Time after time advancing soldiers reported the supposedly well-cut wire to still be a major obstacle that had to be cut manually with wire cutters of varying descriptions. The eventual use of tanks to drag the wire away was probably the best method discovered in the war.
Berm:
A small flat space left between the rising parapet and the drop of the forward trench wall. It helped stop the parapet collapsing into the trench and also served as a place to keep spare ammunition etc.
Bomb store:
Besides those in bombing pits, supplies of grenades (bombs) were kept nearby in communication trenches for the use of raiding parties and specially trained bombers. More were stored at the front to repel boarders!
Bombing pit/trench:
A short sap, often from the command trench, ending in a small pit a few feet square. It was located within grenade throwing distance of the front line in order that our bombers could attack any enemy who had occupied our front line. It was well stocked with grenades for that purpose in a reinforced bomb store.
Breastworks:
Similar to parapets but built up higher above ground to protect soldiers standing in a shallow trench that could not be dug deeper.
Communication trenches:
These were dug to link the various trench systems running parallel with the front-line. They enabled troops from rear areas to reinforce the front-line garrison without exposing themselves to enemy fire. To defend against enfilade fire and the effect of shells bursting in them they were usually zigzagged or undulating throughout their length. They were often congested and at times soldiers climbed out and proceeded on the surface. Whilst this practice was reasonably safe at night it was very dangerous during daylight hours. Communication trenches were also used to bring up rations and replacement battalions etc.
Duckboards:
Joined slats of wood laid on the floor of trenches to keep the soldiers’ feet out of the worst of the mud and water. Beneath them there was usually a channel cut to carry away water to a sump from where it could (sometimes) be pumped away.
Dugouts:
There were several types of ‘dug-out’ depending upon its purpose. As a general principle the British did not construct substantial subterranean bunkers, as they considered that any shelters were purely for very temporary accomodation. After defeating the enemy they would no longer be required. That is the exact opposite philosophy to the Germans who planned to stay in situ and consequently built very strong and comparatively comfortable fortifications. Theirs were often equipped with electric light and furniture taken from nearby houses.
Officers’ shelters were constructed underground so that he would have a place for administrative work and a centre for local communications. It was essential that protection be afforded from the weather and light artillery fire.
Most dugouts were of a similar construction. Often curved corrugated iron sheets, known as elephant iron, were used to form the basis of the shelter. The roof was next usually reinforced with logs, railway lines or other such material that might be found locally. It was then covered with earth and then rubble to burst incoming shells, followed by as much compacted earth as possible to give greater security and to disguise its existence from aerial observation. Great care was taken that buried telephone lines and approach routes radiating towards it did not betray its presence. The doorways, (usually at least two) would be protected from gas ingress by heavy and wet curtains made from blankets etc. These also served to stop any glimmer of light escaping.
Shelters were also constructed as aid posts and to disguise emplacements for weapons such as machine guns, mortars and artillery pieces. These varied enormously in design and many were simply pure camouflage whereas others were fairly deep. Few British shelters offered more than scant protection from a direct hit from anything heavier than medium shells.
Soldiers generally got by in the fire-trenches with little or no shelter. The front faces of trenches were sometimes excavated, to make a small recess that a man might squeeze into when not on duty. Care had to be taken that the hollowing out did not weaken the trench and cause a collapse that might bury the recumbent soldier. In general the practice was discouraged. Support and reserve lines back from the front and artillery positions etc. were often equipped with deeper shelters for men off-duty to afford protection from shelling. Whatever form of dugout was constructed it was common practise to hang any uneaten food from the roof in sandbags to deter rats. Rodents were a constant menace for besides stealing food they feasted upon rotting corpses, both animal and human. Their droppings were everywhere and they were a major cause of the spread of diseases. Because of the plentiful supply of food they bred at prodigious rates and the size they grew to is the stuff of legends.
Enfilade:
Trenches were designed to avoid, if at all possible, enfilade fire. The word comes the French ‘enfiler’, meaning to skewer. It is slightly complex but generally means fire directed along the longest axis of the target. It could be shots fired along the length of a trench from one end to the other; or along the length of a body of advancing soldiers; or raking fire against the flank of a column of men crossing in front. Because it offers such an opportunity to inflict maximum damage it is to be strictly avoided. Trenches were zigzagged to prevent more than a short length being vulnerable to enfilade fire.
Fire-step:
An earth shelf forming part of the wall of the trench, on the side facing the enemy, for the sentry to stand on at night and see out across No Man’s Land. During daylight hours men sat or lay upon it to rest and thus not obstruct the narrow trench floor. If an enemy trench was taken over it had to be modified with a new fire-step cut into the opposite wall. For this purpose several soldiers carried rather large and heavy army spades and picks when attacking the enemy in battle. Even more were similarly equipped to create extra trenches in captured ground.
Front-line:
This was in two elements. The very front line, which was called the fire-trench, could be continuous or made up of ‘linked’ shell holes or saps forming fire-bays etc. Where it was continuous, although never straight, the line was revetted for strength and often castellated to form traverses. A reserve of ammunition was readily available. Machine guns were usually strategically hidden there to be able to sweep the whole of No Man’s Land. No shelters or overhead cover were permitted in the front-line.
The second element was the command or supervision trench. It was around thirty yards behind the fire-trench, and regularly linked to it. From there immediate help was available in the shape of additional concealed machine guns and bomb throwers sited in pits.
Keep:
A strong point offering all round defence and shelter to its garrison. Some parts of the front relied upon this method of accommodating troops rather than locating large bodies of men in the front-line. When necessary, the men streamed out along a web of communication trenches towards the front or other areas in need of reinforcement.
Loopholes:
The parapets of traverses were periodically pierced obliquely at irregular intervals with loopholes gouged or built into them. These holes were disguised and camouflaged to avoid detection by the enemy. Their purpose was for observation, sighting of machine guns and sniping during the day. The observer etc was often partially protected from enemy sniper fire by bullet-proof (one centimetre thick) steel plates covering the gap. These plates, in turn, had a loophole in them that could be covered by a metal flap. It was vital also that the observer was shielded from behind so that no light came past him to be seen through the loophole. This would easily be seen from the enemy trenches and give away his location.
No Man’s Land:
The area between the opposing forces. It evolved rather than was planned and the distances between the two front lines ranged from a few yards to half a mile or more in places. Sometimes it was so narrow that bombs could be thrown into opposing trenches and conversations easily overheard. It was frequently explored at night by each side’s patrols seeking intelligence or enemy prisoners. The attitude of at least one senior officer, who maintained that there was no such thing as No Man’s Land and that the front line was the German wire, did not help. Whilst perhaps it was understandable, to keep up pressure on the enemy, it no doubt contributed considerably to the growing nightly casualty list in an attempt to fulfil that approach.
Parados:
The build up of earth above the rear of the trench was called the parados. Its purpose was twofold. It protected the trench from the blast of shells exploding at its rear. Additionally it prevented soldiers on sentry duty standing on the fire-step from forming silhouettes against the skyline and thus presenting easy targets. In general terms the front lines ran north – south. Each morning the sun rose behind the German lines and each evening it set behind the British lines. Each side therefore would have been exposed on the skyline in turn if a parados was not constructed.
Parapet:
Earth was built up above the ground in front of the trench facing the enemy. It was called the parapet. It would be about one foot high and several feet broad before sloping towards the ground at around a 45-degree angle. The slope was designed to help deflect bullets and the blast of shells etc upward. The purpose of the parapet was to shield the sentry standing on his fire-step and generally add strength to the trench. For it to stop a bullet from a rifle or machine gun the parapet needed to be five feet thick if made from clay. Other soil types offered greater protection especially if they were very stony or made from compacted sand. The height of the parapet depended largely upon the depth of the trench, which could vary considerably.
Periscopes:
These were a vital trench tool used to see over the parapet during daylight hours and survive. Some were professionally manufactured whilst others were improvised by using pieces of salvaged mirror fixed in a wooded frame. Snipers shot at periscopes, as well as imprudent heads. Dummy periscopes were made so that the path of the bullet could be traced and perhaps the position of the sniper revealed.
Pill Boxes and Bunkers:
Strong steel reinforced concrete constructions to supplement trench systems especially where continuous lines were not possible. Their existence enabled fewer men to be employed guarding a section of front for they usually had great firepower from machine guns and were difficult and dangerous to neutralize.
Reserve line:
This was perhaps 500 yards behind the front and consisted of conventional trenches, linked redoubts or dugouts, holding reserve soldiers available to form a counter-attack if the front was over-run.
Reserve trench system:
These were successive lines of trenches similar in design to the front-line and linked to it and each other by communication trenches. There were often several lines of trenches some distance behind the front. They were not however so far apart that each line could not support its neighbour.
Sap:
Usually a short cul-de-sac trench dug out from a main position – generally, but not always, from the front-line and into No Man’s Land for the purposes of observation and as a listening post. They were originally devised as a method of approaching a fortified position within the relative safety of a trench that was progressed towards the enemy. The man who dug saps was known as a ‘sapper’.
Russian Sap:
It was similar to a sap but dug below ground level in the form of a shallow tunnel. When close enough for its purpose it would break through to the surface.
Shell trench or slit trench:
Short, narrow and deep trenches coming off communication trenches parallel to the front to afford protection during an artillery barrage. The men usually remain standing, with an NCO in charge, ready for action as soon as the shelling ceases.
Special purpose trenches:
Telephone lines for general contact between the front and rear areas were laid in trenches and were often fixed to the trench walls. Unfortunately they were very exposed and easily broken by both enemy fire and careless soldiers. Important telephone lines were buried, often in triplicate, in ‘trenches’ six feet deep, which were then backfilled to bury and hopefully safeguard the lines.
Sump:
A pit dug below duckboards to collect excessive rainwater so that it could be drained or pumped away.
Support trenches:
Similar in design and strength to the front-line trenches, to which they were linked by numerous communication trenches, to facilitate rapid reinforcement. They were sited around 100 yards behind the front and often incorporated some dugouts to offer shelter to soldiers during an artillery bombardment.
Traverse:
A traverse was an integral part of the trench that gave it that castellated appearance when seen from above. They are designed to protect against enfilade fire sweeping the length of the trench and to minimize the blast damage from a shell exploding in it. They also give protection and afford some ability to recapture a section of trench that may be occupied by the enemy. For this reason loopholes were often cut into the sides of traverses. The distance between traverses ranged from thirteen to twenty feet – centre to centre. The techniques for regaining a partially captured trench demanded that the distance must be close enough to throw a grenade into the next traverse but one.
Trench block:
Sometimes the same line of trench was occupied by both sides. This usually occurred during an attack. To stop infiltration along the trench it was blocked, by defender or attacker, with whatever was to hand. If there was a predictable risk of invasion pre-constructed barriers of barbed wire in frames were set ready for rapid deployment. Often two blocks, several yards apart, were deployed for better defence.
-
Weapons of War, an introduction and definition of terms
All ‘guns’, using the word generically, and no matter whether pistol, rifle, machine gun, mortar or artillery piece, have similar methods of operation and fulfil similar roles to a greater or lesser degree. Each normally uses a chemical propellant, effectively a relatively slow burning explosive, to drive a projectile towards its target.
Originally, guns fired mostly spherical objects through a smooth-bored barrel. The poor accuracy was greatly enhanced by rifling - a series of spiral groves cut into the inside (the bore) of a gun barrel - which caused the bullet or shell to spin. The gyroscopic effect created improved range and accuracy considerably as the projectile remained point first and thus streamlined. Many rifling groves have a right hand twist but the British SMLE rifles and Vickers machine guns, along with some French weapons, have a left hand twist. This can easily be seen impressed on fired bullets. The copper (driving) bands on fired artillery shells will be seen to have been scored by the rifling as well. If a bullet or shell does not bear indications of rifling then it probably has never been fired. If the driving band on a shell has been removed, then it is often difficult to tell whether or not it has been fired.
In this section a brief description of the most important guns and types of guns will give an idea of the basic operation of the many hundreds of variations employed by the belligerent nations.
All small arms, machine guns and the lighter artillery pieces use a self-contained ‘round of ammunition’. This usually consists of a brass (or alternative material) cartridge case containing in its base a primer that, on being struck by a firing pin, explodes and sends a jet of flame into the cartridge case. Inside the cartridge case is a compound of propellant such as cordite or nitrocellulose that is lit by the primer. Pressure builds up and forces the bullet or shell out of the neck of the case into the barrel of the gun and onwards towards its target. The bullet or shell may be solid or may contain various materials depending on the space available and its purpose. The round of ammunition is initially placed, ready for firing, into the base or ‘breech’ of the barrel. That is a slightly wider and stronger area built to contain the complete cartridge case. In small arms the term used is ‘chamber’.
The term ‘small arms’ applies to the weapons usually carried by a soldier, such as a pistol, rifle or light machine gun. They were cleaned regularly to try to ensure they would fire when required. Oil was kept in a small brass tube in a hollow in the butt of the rifle along with a cord, weighted at one end and known as a ‘pull-through’. A small piece of flannelette, measuring four by two inches, was inserted in a loop in the cord, lubricated with oil, and pulled through the bore of the gun to remove fouling that could cause rust. The flannelette was supplied in rolls and strips torn off it as required. During the war enough length of flannelette was supplied to more than circle the earth at the equator. There are numerous excellent specialist books detailing specific guns, from pistols to the largest artillery pieces, which may be consulted if required.
Rifles & bayonets:
The rifle was the personal weapon, and most important piece of kit, of most soldiers in the First World War. It was cherished or hated but nevertheless cleaned and inspected regularly. Many different rifles or pattern of rifles were in use by the belligerent nations throughout the 1914-1918 war. Shorter rifles, some intended for use by the cavalry, were called carbines. Here we only briefly consider two of the most famous rifles.
British Rifle:
The standard service rifle of the Great War was the Short, Magazine, Lee-Enfield or “SMLE” as it was known. The name came about because: The rifle was shorter than earlier versions and it had a magazine for cartridges. James Lee invented the rear-locking bolt system. And it was initially made at the Royal Small Arms Factory at Enfield, Middlesex. Later, several wartime contractors, both at home and abroad, manufactured it. Various marks of the rifle evolved but the most common during the Great War were the Mark III and Mark III* which simplified the earlier version. The weight of the SMLE was eight pounds ten ounces [4Kg], unloaded and without a bayonet.
The rifle’s magazine held ten cartridges, otherwise known as ‘rounds’. They were loaded into it from above using disposable clips which each held five cartridges. The rifle used a bolt-action system. To shoot, each round had to be fed into the part of the barrel, known as the chamber, by using the bolt. It was opened and closed in a somewhat similar fashion to a common door bolt. As the bolt was lifted, thus unlocking it and then pulled to the rear, any previously fired cartridge was ejected. Simultaneously a fresh cartridge was pushed up by a spring from the magazine beneath it. The bolt was then pushed forward, feeding that cartridge into the chamber. Finally, and before the rifle could be fired, the bolt was pushed down to lock it safely into place. The rifle was aimed and its trigger squeezed. After each shot was fired the above procedure had to be repeated. The pre-war British infantry soldier was trained to fire his rifle at the rate of fifteen accurate shots per minute. This endeavour entailed reloading the magazine that only held ten rounds. Such a sustained high rate of rifle fire gave rise to the German belief that we had far more machine guns than was the case in the early days of the war. Unfortunately the high standard of marksmanship was unable to be maintained during accelerated wartime training. An average of perhaps eight rounds per minute for rapid fire would be more realistic.
The standard British rifle cartridge of the time was of ·303 calibre and had evolved into the Mark VII. The 174-grain spitzer (that is pointed, as opposed to round-nosed) bullet had a muzzle velocity of 2,440 ft/sec. that delivered 2,408ft/lb energy at the muzzle. For its time it was a highly efficient cartridge in all aspects. And, according to Ordnance Committee calculations, should the rifle be elevated to nearly 35º, the bullet was theoretically capable of travelling 4,457 yards [4,075m] before it would fall to the ground some 31 seconds later. They said that even at that distance it would be travelling at 416 ft/sec and capable of inflicting serious injury. In fact it took just one second to travel the first 600 yards [548m] – the velocity decaying rapidly the further it travelled. For practical purposes 1000 yards was considered its reasonable maximum range although in reality, most aimed shots were at considerably less distance than that. After all, if one cannot see the target they can hardly be expected to hit it! That said, the SMLE was sighted to 2,000 yards and the Vickers machine gun to 2,900 yards, so very long range shooting had at least been contemplated when these weapons were designed. Hundreds of millions of rounds were fired during the war but we still had over 325 million ·303 cartridges left over by November 1918.
Incendiary ammunition was developed for use against Zeppelins and other specialist ammunition was introduced to fill particular requirements.
Bayonet:
The SMLE accepts a sword bayonet Pattern 1907 that has a blade length of seventeen inches, wooden grips and weighs, with scabbard, over one and a half pounds. [.75kg] It was attached to a circular protuberance just below the muzzle of the rifle and clipped into place on a lug beneath the barrel. The scabbard in particular was simplified to meet wartime production quotas and the bayonet itself was soon made without an upturned hook to its quillon [cross-guard] that was regarded as unnecessary.
German Rifle:
The standard rifle of the Great War was the Mauser Gewehr [rifle] 98. It had a calibre of 7.92mm and overall its operation, size and performance was roughly similar to the British SMLE. It did however have two major differences. The bolt design, and especially the method of locking it, gave the rifle greater strength and accuracy. The drawback was that its rate of fire and reloading was far slower than the SMLE. Additionally, the magazine of the Mauser G.98 held only five rounds. It was however an extremely good rifle and served not only the German Army but also many others throughout the World.
Bayonet:
The G.98 accepted many different bayonets, some of which were Ersatz models, made wholly from steel to economise on other materials and simplify production. The most famous German bayonet was by far the so called ‘butcher’s knife’ for that is what it closely resembled. Here again there were several variations but the one that caused most concern and adverse propaganda, was the saw-backed version. It was portrayed as barbaric but in reality was used as a dual-purpose item by pioneers and artillerymen. The saw back was intended for cutting wood and not to inflict a jagged wound – although it could no doubt do so if thrust in too deeply.
Pistols:
The pistol or handgun was initially almost a badge of office for officers and very few others carried one. Officers had to purchase their own pistol, which could be any make or model but had to accept government ammunition of ·455 calibre. Most initially chose the Webley Mk IV revolver but the Webley Mk VI revolver, slowly introduced from mid-1915, gradually became the firm favourite. It held six rounds and, with practice, was capable of accurate shooting to 50 yards or more. Later it was issued to other ranks, at government expense, where deemed necessary – for example to machine gunners, despatch riders, tank crews etc, where a rifle would have been unnecessarily cumbersome.
The popular German pistol, epitomised in films and indeed used extensively throughout the war, was the P’08 Luger in 9mm (parabellum) calibre. That is essentially the same cartridge still used throughout the world in hundreds of different firearms. The P’08 Luger is a semi-automatic pistol holding eight rounds in a detachable magazine that fits inside the grips [handle]. As each shot was fired, the empty case was automatically ejected and a fresh round loaded ready to be fired next time the trigger was depressed. The magazine was removed to reload or, it could be replaced by a spare magazine that was already filled. This enabled a faster rate of fire than a revolver that had to be opened by the shooter and the fired cases manually ejected, before fresh cartridges were inserted. Then the weapon had to be closed ready to resume firing.
Machine Guns:
Unlike a rifle or pistol, a machine gun is a firearm capable of continuous fire for as long as the trigger is depressed and the ammunition supply remains available – subject to mechanical failure. Britain and Germany used similar medium machine guns, both based upon the original design of Sir Hiram Maxim, but modified to suit requirements. The two guns performed in a very comparable way. The British version was the Vickers Machine Gun Mk 1 in ·303 calibre. When complete, with its essential water for cooling, it weighed over 40lb. The necessary tripod weighed an additional 52lb. In total, but without ammunition, 92lb [42kg] – not easily portable! Medium machine guns were usually sited in very well concealed positions slightly back from, or actually at, the front.
The German gun was the MG ’08 in 7.92mm calibre and was usually mounted on a sledge rather than a tripod. Altogether it weighed 137 lb [62kg]. Both countries’ guns fired at the rate of around 400 – 500 rounds per minute with the ammunition contained in fabric belts that each held 250 rounds. A team member fed the belts of ammunition into the gun. They were heavy (a box of 250 rounds and belt weighed 22lb) and did not last long on continuous fire. Most often the guns were fired in short bursts of a few rounds to conserve ammunition stocks and avoid the gun overheating. Instances of 10,000 rounds per hour, sustained fire, are however well documented. In 1915 a lighter version of the German MG ’08 was introduced for certain tasks.
The ·303 Lewis Machine Gun was introduced into British service in 1915. Of American design, this ‘lightweight’, at 28lb [13kg], gun revolutionised warfare. For the first time it was possible for a single infantryman to carry into action a fully automatic weapon. It was air cooled, fired at a rate of up to 550 rounds per minute and used a circular magazine holding 47 rounds of ammunition. A full magazine would only last five seconds on continuous fire but firing in short bursts was always more efficient. Naturally the machine gunner had assistants carrying spare magazines of ammunition, but it was no longer necessary to have a large support team for every machine gun. A stripped down version was made for use in aircraft and the magazine for that held 97 rounds.
Hand Grenades:
The use of hand grenades or ‘bombs’ was well known prior to World War 1. Indeed the Grenadier Guards history dates back to 1656. As the name implies, grenadiers originally specialised in throwing bombs at the enemy. It was not however until the Great War that ‘safe’ yet easily ignited bombs were developed. And the throwers were by then usually referred to as ‘bombers’. Germany started the war better equipped with safer and more reliable bombs than the British. Indeed in the early months of the War, British engineers and troops frequently improvised grenades as existing manufactured stocks became exhausted. Some, known as ‘jam-tin bombs’ were simply old tins refilled with explosives and scrap iron, then fused ready to be lit and thrown when the opportunity presented itself. Despite many millions of grenades being thrown, the residual British stock in France at the Armistice was over seven million.
Although a multitude of grenades appeared between 1914 and 1918 I will only consider here the two most commonly encountered: one British and one German, and both coming into use in 1915. From very small stockpiles in 1914 all belligerents manufactured very many millions of grenades during the next four years. It became one of the most effective offensive infantry weapons of the war.
British: The Mills Bomb.
Introduced as the No. 5 Mk I, it was an egg-shaped device made from thick, segmented cast iron that shattered into fragments when it exploded. The base was sealed with a screw plug that was opened to insert the detonator. The top was shaped to accommodate a striker lever and retaining split pin. It weighed nearly one and a half pounds when filled with explosives and was just under four inches in length. A well-trained man could accurately pitch a Mills Bomb about 35 yards. To operate, the bomb was grasped firmly, so as to restrain the striker safety lever, whilst the safety pin was withdrawn. All the time the lever was held against the body of the bomb it would not explode. When thrown (or more properly pitched, rather like a cricket ball) a powerful spring would cause the lever to fly off and simultaneously propel the internal striker into a cap thus starting a timed safety fuze of usually five seconds. When the fuze burned into the main detonator it would explode the bomb. A specialised bomber would carry, in addition to his rifle and other equipment, eighteen Mills bombs in a canvas bucket.
German: The Stick Grenade.
Evolved from the 1915 model, the 1917 version is the one most frequently portrayed in books and films. At nearly double the weight and over three times the length of a British Mills Bomb the German stick grenade was more cumbersome but its very length permitted it to be thrown further than the Mills. The four-inch long cylindrical body of the grenade had a hollow wooden handle screwed to its base. Its popular name of ‘potato masher’ accurately described the weapon that, with its thin sheet steel body, relied upon explosive force rather than fragmentation for effect. To use, a screw cap was removed from the bottom of the hollow handle thus releasing a ceramic pull ring with a thin cord attached. The other end of the cord was attached to a friction ignition system that, upon pulling, started a time fuze of about six seconds. There was no going back - once the fuze was activated the bomb had to be thrown. Other versions were introduced that automatically ‘lit’ upon being thrown.
Like most other munitions of war there are many variations of grenades, their exact measurements, methods of fusing and use differed considerably but the basic principles remained. Each was a small explosive bomb that could be carried relatively safely by a soldier until required. It was then activated and lobbed towards the enemy with varying degrees of success. Some grenades were designed or modified to be fired using rifles or other launchers in order to achieve a greater range. Those interested should refer to specialist publications for precise information.
Mortars:
One of the main differences between a gun and a mortar is the cost and simplicity of production of the latter. Fulfilling a similar role to a howitzer, the mortar was designed to ‘lob’ an explosive projectile over a relatively short range but in a high arc or trajectory so as to clear intervening obstacles. They are primarily muzzle-loading weapons and, in smaller calibres, relatively light and portable. Many, but not all mortars were smooth bored, again for simplicity. Being relatively small many mortars could be concealed in and fired from trenches whereas this would have been all but impossible for an artillery piece.
In the conditions of the Western Front the mortar was an ideal weapon. Generally the opposing trenches were less than 800 yards apart – most far less than that. With the high arc of the bomb it descended almost vertically and in consequence it was possible to lob a mortar bomb directly into an enemy trench. As long range was not required, the mortar bomb was propelled by a relatively small charge that developed low pressures. In consequence very strong and heavy barrels were not necessary, which all added to the portability of the mortar. With a much smaller propellant charge the pressures on the bomb were also less than on a shell fired by a gun or howitzer. Again, because of this, it was possible to reduce the amount of protective steel surrounding the high explosive bursting charge in the bomb. Overall the ratio of charge to total weight was extremely efficient at up to 40 per cent as opposed to around 12 per cent, or sometimes much less, explosive in a typical shell fired from an artillery gun or howitzer.
Mortars were much feared by soldiers because of the devastation they caused. However, because of their operation – low velocity and high angle of fire - experienced troops learned to listen out for the distinctive ‘plop’ of their being fired. They then scoured the skies for sight of the mortar bomb coming their way and rapidly took evasive action! Infantry soldiers not only disliked enemy mortars, they were not too impressed by our own mortar companies which had a habit of turning up in a trench unannounced, firing off a few bombs and then retreating rapidly from whence they came. The enemy was soon able to calculate the area the assault originated and retaliate in kind leaving the poor infantry to reap the whirlwind occasioned by the mortar teams.
At the beginning of the war the German (and Austro-Hungarian) Armies had a variety of huge mortars (known in Germany as Minenwerfer – literally ‘mine-launcher’). The enormous 42cm Mörser, along with the 25cm model and others, was used to destroy the forts in Liège, Namur and Mauberge. Later on came many more designs, notably the light 7.58cm model. All these weapons were highly efficient and yet the French and British really had next to nothing to counter them to start with. Even large catapults were tried in desperation.
Experiments with French museum exhibits, relics from earlier conflicts, convinced the British that mortars has a lot to offer. From the fruits of the experiments two models evolved in 1915 after many failed or inefficient prototypes. Officially named Bomb HE 2" Trench Mortar, our first example was a spherical bomb mounted on a two inch steel tubular stave. It was affectionately called either a ‘plum pudding’ or a ‘toffee-apple’ by the troops. The bomb weighed altogether 60lb [27Kg] of which 10lb was the weight of the two inch stave which occasionally, rather alarmingly, came straight back towards the firer! A plum pudding was capable of being fired 500 yards. The large explosive charge of 20lb of ammonal, lyddite or amatol was quite effective in destroying wire entanglements if the bomb exploded in the correct place. There were however teething problems. The early bombs, with a slow-to-react fuze created a large crater, which gave a false sense of security. It often appeared from a distance that the wire had been cleared when in fact it was hidden, perhaps under water, in the crater. This problem was solved by the introduction of a fuze [No. 107] that detonated the bomb instantaneously, shattered the wire into fragments and formed little or no crater. One of the drawbacks to this weapon was its weight. The bombs were not exactly light at 60lb, including the stave, and the mortar itself weighed in at 285lb [130Kg], which did not lend itself to rapid portability.
The other stalwart British mortar was the three-inch Stokes. Weighing almost ten pounds [4.5Kg] that bomb could travel nearly 1,200 yards [1,100 meters]. It was initially fitted with a modified grenade fuze before an ‘always’ impact fuze was developed. [It would explode the bomb no matter which way up it landed.] The mortar, from which it was fired, was very simple and reasonably portable, consisting of a metal tube on a base-plate supported by a bi-pod mount. Sights were added for aiming purposes. Bombs could be fired rapidly by simply dropping each one, base first, down the barrel after removing the safety pin. On reaching the bottom of the barrel a striker automatically fired a propellant charge contained within the bomb. Because of its simplicity a rate of fire of twenty-two bombs per minute has been known, with often seven or more being in the air at once from the same mortar!
After initial confusion as to who exactly was responsible for these new weapons a system evolved whereby Brigades were in charge of light mortars such as the Stokes, and Division Artillery took charge of the heavier equipment. Dedicated trench mortar officers were appointed and personnel had their own identifying badge.
Landmines:
Landmines must not be confused with large charges placed at the end of tunnels dug under enemy positions and detonated by the minelayer at a time of his choosing.
A landmine is triggered, usually unintentionally, by its victim. The modern concept of a landmine or anti-tank mine is a device designed and manufactured to be hidden and detonate when trodden on or run over. It is far removed from those deployed in the Great War. Those mines were generally improvised from surplus shells or mortar bombs rather than being purpose built.
Many buildings and apparently abandoned equipment were referred to as ‘mined’ (but more properly ‘booby-trapped’) by retreating German forces using rigged grenades or demolition charges with rather sophisticated fuzes. Sometimes those mines exploded after a time delay, occasionally as long as three days, but more often unwary soldiers fell foul of the devices.
Explosives:
During the First World War vast quantities of different explosives were used for a multitude of purposes, ranging from the propellants in small-arms cartridges, to the bursting charges of the millions of shells and bombs.
There were further specialised explosives employed by engineers in cutting railway lines or blowing up bridges for their retreating armies. The signal rockets and flares used by the million were a form of explosives. So too, were the enormous underground mines detonated with such dramatic effect.
Most explosives are substances that undergo violent decomposition accompanied by the formation of large quantities of heat-expanded gas and sudden high pressures. For military purposes, an explosive must be capable of retaining its original stable form until it is required to be detonated - an explosive is by it's very nature, unstable. The degree of instability has to be precise otherwise it would either be a danger to transport and use or would fail to ‘go off’ when required.
The many explosives available either detonate or burn at varying rates and each has specific physical characteristics and purpose. Gunpowder, an old general purpose 'low' explosive will decompose or burn at around 1,200 feet per second [365 metres/second]; whereas for example, TNT, a ‘high’ explosive will similarly 'decompose' (detonate) at 22,800 feet per second [6850 metres/second] or, to put it another way, at over 4¼ miles per second. Just a slight difference!
For mining purposes the requirement is for an explosive with great lifting potential rather than one that gives a sudden shattering effect. This is achieved by employing a substance with a lower velocity of detonation, rather than a high-speed blast. The aim is to push the material out to create a large crater and not just blast a small hole through it. Indeed some underground mines never broke through to the surface at all. They resulted in an underground cavity, which is called a camouflet. These were often used to destroy the oppositions mining activities using relatively small charges.
Probably the best explosive of all for lifting great masses of earth in mining is gunpowder. It was used initially but its drawbacks over more modern explosives rendered it impractical. It is bulky, very flammable and requires to be tamped [packed in with clay etc] for maximum effect. Far more practical is ammonal, which does not suffer the same drawbacks but, being very hygroscopic, must be sealed from damp. As ammonal is several times more powerful than gunpowder, (but not too powerful), a considerably smaller mine chamber is required, thereby reducing the attendant risks of digging and shoring a large orifice for the installation of the charge.
Chemical weapons - Gas:
There were many types of gas used in the Great War. Some, such as chlorine, phosgene and mustard were potentially, if not immediately, lethal. Others such as types of teargas were designed to incapacitate rather than kill.
The first known use of chemical weapons in the Great War, in any form, was on 27 October 1914, when 3,000 shells containing Niespulver (a form of sneezing agent) mixed with shrapnel, were fired at British and Indian troops. No one seemed to notice the irritant and its use was only discovered after the Armistice. Other inconsequential uses of gas followed but the first significant deployment was by the Germans on 22 April 1915 when clouds of chlorine gas were released from thousands of cylinders dug in near Langemarck and blown by the wind towards St Julien in the Ypres Salient. The British retaliated in kind at Loos in September 1915, but with limited success, as the chlorine gas released from their cylinders drifted back when the wind changed, on to British soldiers.
Most belligerents soon adopted the use of gas and many different types were produced with varying results. The first lethal gas, chlorine, was not particularly efficient once the initial element of surprise was overcome. It was visible, had a strong smell and even simple masks prevented heavy casualties. Phosgene was far more deadly. It was not so easy to detect and often had a delayed action. Perhaps the most unpleasant gas of all was mustard, which was a blistering agent. If inhaled in quantity it slowly destroyed the lungs. If it got on the skin it produced painful burns that were not easy to treat. It was not specifically intended to kill – although it did produce many fatalities. There were several other gases of varying deadliness tried by both sides.
Gas was initially dispersed from cylinders but soon shells and bombs were developed which could send large quantities of gas into enemy lines regardless of wind direction. One of the most efficient devices was the Livens Projector – a type of mortar that discharged a cylindrical bomb filled with 30lb of poison gas to a distance of 1,500 yards.
Throughout the summer of 1915 desperate measures were taken to find protection from poison gas. Makeshift pads from cotton waste and even sanitary towels to be soaked by the soldiers in bicarbonate of soda or even urine were sent to the front. Soon the first gas helmets, albeit of limited value, were issued in time for the Battle of Loos. Better protection evolved and eventually the small box respirator, proof against most gasses, became standard issue. They were not however the full answer to mustard gas as that could be absorbed through the skin as well as inhaled. They had the additional drawback of limiting a soldier’s fighting efficiency because the eyepieces quickly steamed up. Officers in headquarters’ in the effected zone were not immune. They too had to wear masks as the gases were heavier than air and could penetrate their dugouts etc.
Warnings of the presence of gas were usually sounded by banging on suspended shell cases that formed quite efficient gongs. A keen eye was also kept on the wind direction, especially in the early days, when gas was dispersed from fixed cylinders.
Although dreaded by soldiers in the war poison gas was not as lethal to British forces as imagined. Russian soldiers are believed to have suffered considerably more from gas poisoning as they were inadequately protected from its effect.
Reasons For Discharge WW1
-
Reasons For Discharge - Explanations from King's Regulations
(i) References on enlistment being unsatisfactory.
(ii) Having been irregularly enlisted.
(iii) Not likely to become an efficient soldier, (with sub clauses as below)
(a) Recruit rejected both by Medical Officer and Approving Officer
(b) Recruit passed by Medical Officer, but rejected by a Recruiting Officer stationed away from the headquarters of the recruiting area, or by Approving Officer
(c) Recruit within three months of enlistment considered unfit for service
(cc) Recruits with more than three months service considered unfit for further military service
(d) Recruit who after having undergone a course of physical training is recommended by an examining board to be discharged, or in the case of a mounted corps is unable to ride
(e) Soldier of local battalion abroad considered unlikely to become efficient
(f) Boy who, on reaching 18 years of age, is considered to be physically unfit for the ranks(iv) Having been claimed as an apprentice.
(v) Having claimed it on payment of £10 within three months of his attestation.
(vi) Having made a mis-statement as to age on enlistment (with sub clauses as below)
(a) Soldier under 17 years of age at date of application for discharge
(b) Soldier between 17 and 18 years of age at date of application for discharge(vii) Having been claimed for wife desertion (with sub clauses as below)
(a) By the parish authorities
(b) By the wife(viii) Having made a false answer on attestation.
(ix) Unfitted for the duties of the corps.
(x) Having been convicted by the civil power of_____, or of an offence committed before enlistment.
(xi) For misconduct.
(xii) Having been sentenced to penal servitude.
(xiii) Having been sentenced to be discharged with ignominy.
(xiv) At his own request, on payment of _____ under Article 1130 (i), Pay Warrant.
(xv) Free, after ____ years' service under Article 1130 (ii), Pay Warrant (with sub clauses as below)
(xva) Free under Article 1130 (i), Pay Warrant
(xvb) Free to take up civil employment which cannot be held open
(xvi) No longer physically fit for war service.
(xvia) Surplus to military requirements (having suffered impairment since entry into the service).
(xvii) -
(xviii) At his own request after 18 years service (with a view to pension under the Pay Warrant).
(xix) For the benefit of the public service after 18 years service (with a view to pension under the Pay Warrant).
(xx) Inefficiency after 18 years service (with a view to pension under the Pay Warrant).
(xxi) The termination of his ____ period of engagement.
(xxii) With less than 21 years service towards engagement, but with 21 or more years service towards pension.
(xxiii) Having claimed discharge after three months' notice.
(xxiv) Having reached the age for discharge.
(xxv) His services being no longer required.
(a) Surplus to military requirements (Not having suffered impairment since entry into the service).(xxvi) At his own request after 21 (or more) years service (with a view to pension under the Pay Warrant).
(xxvii) After 21 (or more) years qualifying service for pension, and with 5 (or more) years service as warrant officer (with a view to pension under the Pay Warrant).
(xxviii) On demobilisation.
Theatre of War Codes
-
What do the codes mean in the Campaign Medal Rolls 1914-1919?
For disembarkations up to 31 December 1915
These codes generally apply to men who won the 1914 or 1914-15 Star, but not those who only won the British War Medal and Victory Medal pair.
- 1 Western Europe
- 2 Balkan Theatre
a) Greek Macedonia, Serbia and Bulgaria
b) Gallipoli and Aegean Islands - 3 Egyptian Theatre
- 4 African Theatre
a) British East Africa, German East Africa, Rhodesia, Nyasaland and Uganda
b) German South West Africa
c) Kamerun (Cameroon)
d) Togoland
e) Caprivi Zipfel Rhodesia - 5 Asiatic Theatre
a) Mesopotamia and Bushire
b) South West Arabia
c) Aden
d) Muscat (Musquat)
e) Seistan
f) Tochi Valley
g) Hafiz
h) Katlang, Rastam and Swati
i) Landekai Ridge
j) Perim
k) Kalat
l) Katchin Hills
m) Tsing-Tau - 6 Australasian Theatre
a) German New Guinea including
b) Nauru
c) German Samoa
For disembarkations from 1 January 1916
These codes generally apply to men who won the British War Medal and Victory Medal pair, but no Star.
- 1A France and Belgium
- 1B Italy
- 2A Greek Macedonia, Serbia, Bulgaria or European Turkey
- 2B Gallipoli
- 3 Russia (up to 1/2 July 1920)
- 4A Egypt (up to 18/19 March 1916)
- 4B Egypt (from 18/19 March 1916)
- 5A East Africa, Nyasaland and Northern Rhodesia
- 5B South West Africa
- 5C Cameroon
- 5D Nigeria
- 5E Togoland
- 6A Hejaz
- 6B Mesopotamia
- 6C Persia
- 6D Trans-Caspia
- 6E South West Arabia
- 6F Aden
- 6G Frontier regions of India
- 6H Tsing-tau
- 7A New Britain
- 7B New Ireland
- 7C Kaiser Wilhelmland
- 7D Admiralty Islands
- 7E Nauru
- 7F German Samoa

View the War Diaries
See the Great War being fought day by day. 4,500 Diaries, 1.52 million full colour pages.
find out moreMore information

Contact us
Naval & Military Archive
Unit 5 Riverside
Brambleside
Bellbrook Industrial Park
Uckfield
East Sussex
TN22 1QQ
United Kingdom
Email:info@nmarchive.com
Copyright 2025 The Naval & Military Press
Designed by Samson Web Design | Developed by Creative Skills